Updating WHMCS
You can check for the most recent updates and update WHMCS quickly and easily from directly within the Admin Area.
You can access this feature at Utilities > Update WHMCS.
Checking for Updates
The system automatically checks for updates periodically. When an update becomes available, a notification will appear in the Admin Area.
You can also check for updates manually by clicking Check for Updates. You may need to do this to see recent releases prior to the next automated check.
Updating WHMCS
If you see a An update is available message, you can click Update Now to begin an automatic update.
Make certain that you have performed all of our recommended steps to prepare before initiating an upgrade.
- This includes checking our Release Notes and system requirements, verifying the status of your customizations, testing the update on a testing environment, and performing a backup.
- For steps and more information and recommendations, see Prepare to Update WHMCS.
Requirements for Automatic Updates
WHMCS has several system requirements for automatic updates:
- A PHP memory limit of at least 128 MB.
- At least 250 MB of free disk space.
- The PHP
allow_url_fopensetting is enabled. - The PHP
max_execution_timesetting is60seconds or more. - The PHP Zip Extension or the
proc_openPHP function are enabled. - The PHP
open_basedirsetting includes the entire WHMCS document root.
Verifying the Upgrade
After the update finishes, check to ensure that WHMCS is working properly. We recommend testing all of the important features and functions in WHMCS, like logging in as a client and as an admin, viewing products, submitting support tickets, and placing new orders.
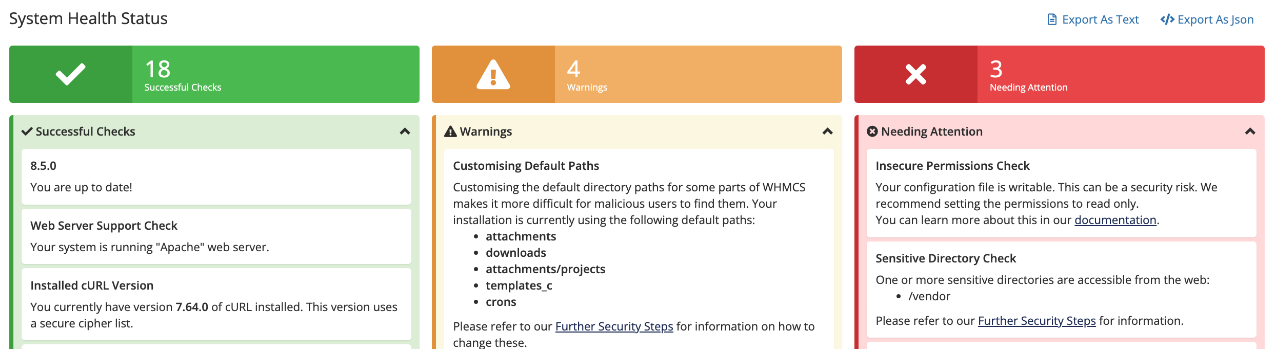
We also recommend monitoring the alert messages at Configuration () > System Health for the 24 hours following the update:
Update Settings
You can also configure settings for your update channels, set a maintenance message to display during updates, and specify the directory to use for staging update files.
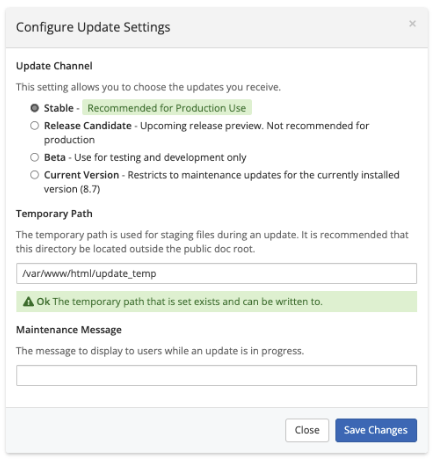
Update Channel
You can choose the update channel for your WHMCS installation. This setting indicates the least-stable version that you want to use for updates.
WHMCS ships new updates using the following update channel options:
| Update Channel | Description |
|---|---|
| Stable | Only receive Stable updates (General Availability releases) to your installation. We recommend this update channel for most installations. |
| Current Version | Only receive maintenance updates for the currently-installed major and minor version.
|
| Release Candidate | Receive releases after beta testing but before we release them to the Stable tier. |
| Beta | Receive the latest versions of WHMCS as we release them to the Beta tier. We only recommend selecting this update channel for development and testing installations. |
Patch and Maintenance Release Updates
If you are on a WHMCS version that is in Long Term Support and we issue a patch for that version, you can perform an update to apply the patch without moving to a newer WHMCS version.
To do this:
- Select the Current Version update channel.
- Click Check for Updates to refresh the available version.
- Proceed with your update as usual.
You may wish to change this setting back to Stable after updating to ensure that future checks display the most recent stable version.
Temporary Update Path
The temporary path allows you to stage files during an update. For security reasons, ensure that this directory is outside of the public document root, like the attachments, downloads, and templates_c directories.
- The path must be an absolute path (for example,
/var/www/html/update_tempinstead of~/update_temp). - The PHP user must be able to write to this path.
Maintenance Message
Use this option to set a message to display to other admins and users whenever an update is in progress.
Update File Changes
During the update process, WHMCS will update all of the core files to ensure that WHMCS continues to work correctly. This includes updating the default templates and order forms.
Updates overwrite the following files:
- Language Files (
~/whmcs/langand~/whmcs/admin/lang) - Default Templates (
~/whmcs/templates/twenty-one,~/whmcs/templates/six, and~/whmcs/templates/orderforms) - WHMCS-Supplied Modules (
~/whmcs/modules/) - Core WHMCS Files
When you initiate an update at Utilities > Update WHMCS, WHMCS will scan the default template directories. You will see a warning if the scan finds any customizations that updating would overwrite.
Customizations to Open-Source Files
We provide some WHMCS files as open-source code, in order to allow customization (for example, the /aff.php file). Make certain that you back these customizations up before performing updates and restore them manually after the update is complete.
Preserving Customizations
When you customize parts of WHMCS, make certain to use the recommended methods:
- Copy the desired files if you want to customize a theme or template. Make certain that you do not store your customizations in the default template folders.
- Use override files if you want to customize a locale.
- Ensure that you create a uniquely-named copy of any modules that you customize.
- Ensure that you create override files for any changes to the shipped
dist.whois.jsonanddist.additionalfields.phpfiles. To avoid overwriting your customizations, you must store changes in the appropriate override files.
Troubleshooting
You can find the log of Automatic Updater actions in the WHMCS database. Review the tblupdatelog table for the most recent entries (the highest id values).
Checking for Updates
You may encounter the following common issues while checking for available WHMCS updates:
| Error or Issue | Cause | More Information |
Unable to Perform Automatic Updates | This error can have many causes. | Automatic Updates Unavailable |
Check for Updates Failed | This error can have many causes. | Check for Updates Failures |
Make certain that you have selected a valid Update Channel and then try again | You have not correctly configured the Update Channel setting. | Update Channel Errors |
Updating
You may encounter the following common issues while updating or when an update fails:
| Error or Issue | Cause | More Information |
You are attempting to access the admin area via a directory that is not configured. or You are attempting to access the admin area via a directory that is different from the one configured. or You are attempting to access the admin area via a custom directory, but we have detected the presence of a default "admin" directory too. or The request path cannot be resolved. | You are attempting to access the wrong directory, there is a problem in your admin path configuration, or your admin directory is out-of-date. | Admin Directory Errors |
| The Admin Dashboard appears blank and widgets will not load. | There may be a problem with your system’s table collation values. | Blank Admin Dashboard |
Server Command Error - Curl Error - 28 connect() timed out or cURL error 28: Operation timed out | An operation timed out due to a connection issue. | cURL Timeout Errors |
Down for Maintenance (Err2) | There is a mismatch between the database version and WHMCS version or PHP version. | Down for Maintenance Errors |
A fatal error occurred while fetching the update | This error may occur due to issues with PHP, your server, or your network. | Fatal Error Fetching Update |
Error: failed to open stream: operation failed | The application is unable to confirm the validity of the SSL certificate. | File Download Errors |
| Admins cannot access database backups, storage settings, or updates on WHMCS Cloud installations. | WHMCS Cloud automatically manages certain system functions. | Missing Features on WHMCS Cloud |
Network Issue - Failed Communication with Update Server | This error indicates that your server could not connect to our update server. | Network Issue Errors |
| The most recent WHMCS release does not display when you check for available updates. | The page did not refresh, your settings exclude the new version, or your system does not meet the minimum requirements. | New Version Not Appearing |
no existing installation was detected or WHMCS Not Installed Error | The configuration.php file is not in the expected location, it is not readable, or it does not contain the details for your MySQL® database. | No Existing Installation Errors |
Apply update dry-run detected x permission issues | Existing file permissions are incorrect. | Update Dry Run Errors |
Update Failed An error occurred that prevented the update from completing successfully. | You can find the cause of the issue by examining the full output below the error message. | Update Failed Errors |
Update Message Validation Issue This update contains notification messages that WHMCS could not validate. | Cryptographic validation is failing. | Update Message Validation Errors |
After Updating
You may encounter the following common issues after you finish applying an update:
| Error or Issue | Cause | More Information |
Updater unable to add default database tls options to configuration file: Application configuration file is not writable | The permissions for the configuration.php file prevented the update process from adding new placeholder entries. | Application Configuration Errors |
| After applying an update, some WHMCS features do not function normally, display errors, display with poor formatting, or do not display at all. | In most cases, this behavior is due to outdated customized template files. | Feature Issues After Update |
WHMCS\\Exception\\Model\\GuardedForUpdate: The \\\"WHMCS\\Config\\Setting\\\" record \\\"setting\\\" property is guarded against updates in /path/to/whmcs/vendor/whmcs/whmcs-foundation/lib/Model/Observer.php:0 | There are files from an earlier version of WHMCS in the /admin directory. | GuardedForUpdate Errors |
A recent WHMCS update failed to remove legacy modules. These modules may cause negative behavior if you upgrade PHP and leave them on the system. | The Automatic Updater utility was unable to remove one or more discontinued and unused modules. | Legacy Module Removal Errors |
Last modified: 2025 November 27