cPanel
The cPanel module allows you to add and manage cPanel & WHM servers in WHMCS.
- To use the cPanel module, the server must be a cPanel & WHM server that uses a valid cPanel & WHM license.
- If you want to use a WP Squared server, you must use the separate WP Squared module.
Supported Features
| Create | Suspend | Unsuspend | Terminate |
| ✓ | ✓ | ✓ | ✓ |
| Change Package | Change Password | Usage Updates | Client Area Link |
| ✓ | ✓ | ✓ | ✓ |
Make sure to open the following ports for outbound connections from your WHMCS server:
20862087
Adding a Server
To set up a cPanel & WHM server in WHMCS:
- Go to Configuration () > System Settings > Servers.
- Click Add New Server.
- Select cPanel from the menu.
- Enter the hostname or IP address.
- Enter the username and password or API token.
- For the username and password, use your WHM account credentials.
- You can generate an API token in WHM at Development » Manage API Tokens.
- Click Test Connection.
- Enter the desired additional server details.
- Examine the displayed default port. If your server uses a different port, check Override with Custom Port and enter the correct port.For more information, see Server Port Overrides.
- Click Save Changes.
- If this is the only cPanel & WHM server that is currently in WHMCS, click on the name and ensure that it results in an asterisk (*) next to it. This indicates that it is the default to use when any other non-specific configuration doesn’t apply.
- If Two-Factor Authentication is enabled on your cPanel & WHM server, you must disable it for API requests.
- You can also configure your first cPanel server during initial setup at Configuration () > Getting Started Wizard.
Creating a cPanel Product
You can create a product that provisions accounts on your cPanel & WHM server at Configuration () > System Settings > Products/Services.
When you do this, you can choose between several configurations:
Use an Existing WHM Package
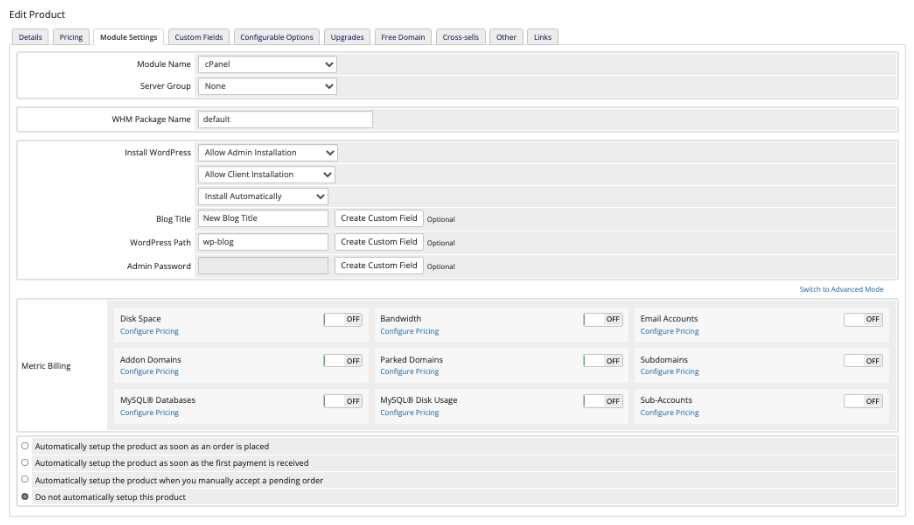
To create a product using an existing package in WHM:
- Select Shared Hosting for Product Type.
- Select the desired hosting plan for WHM Package Name.
Use Custom Package Options
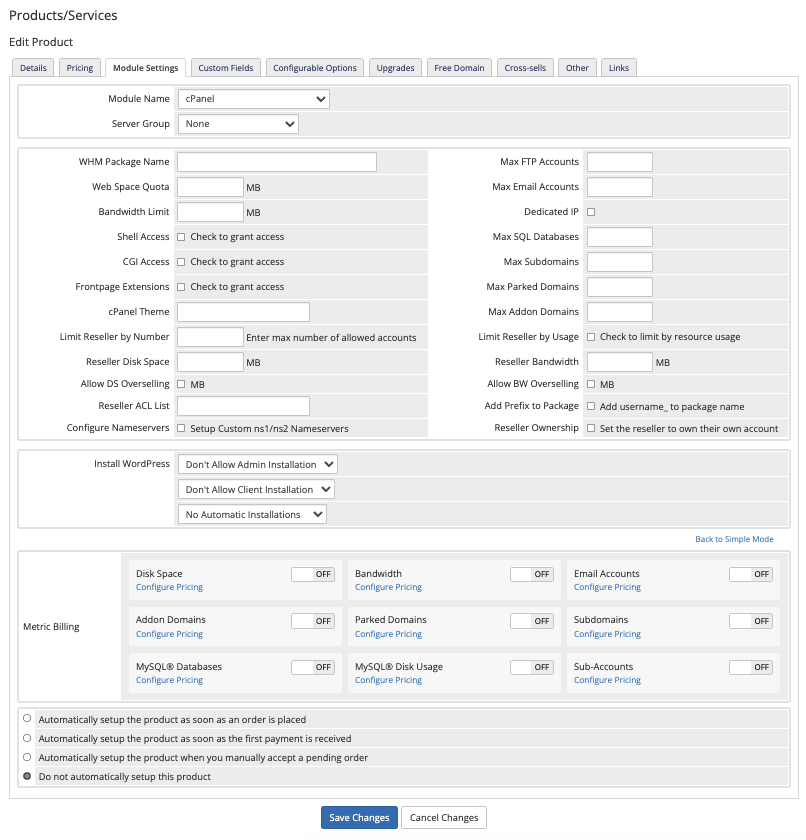
To create a product using custom package options:
- Select Shared Hosting for Product Type.
- Do not select a hosting plan for WHM Package Name.
- Click Switch to Advanced Mode.
- Enter the desired values for each package setting. If you do not enter a value for a setting, the quota will be unlimited.
Create a Reseller Package
In the hosting industry, resellers sell server resources in smaller packages to individual cPanel & WHM users.
root user owns when making usage calculations.To create a hosting product for a reseller account:
- Select Reseller Hosting for Product Type.
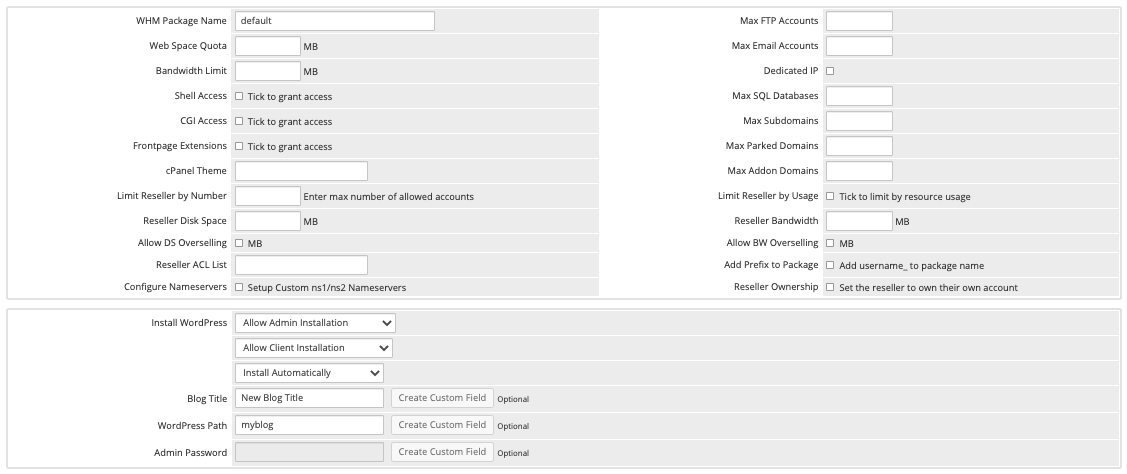
- Do not select a hosting plan for WHM Package Name.
- Click Switch to Advanced Mode and enter the desired values for each package setting.
- If you do not ever a value for a given setting, the quota will be unlimited.
- For Reseller ACL List, enter the name of an ACL that already exists in WHM.You can create ACL lists in WHM at Resellers » Edit Reseller Nameservers and Privileges.
- Make certain to also configure:
- Limit Reseller by Number
- Limit Reseller by Usage
- Reseller Disk Space
- Reseller Bandwidth
- Allow DS Overselling
- Allow BW Overselling
- Configure Nameservers
- Reseller Ownership
Per-Account Billing
When you create a reseller product, you can use usage billing to bill customers for each account that the reseller account provisions. You can choose whether to include a certain number of cPanel accounts in the price and only charge for exceeding a certain limit, offer tiered pricing, or charge for every cPanel account resellers create.
To do this, toggle Sub-Accounts to On under Metric Billing and configure the desired pricing.
When a client orders a product, WHMCS will track the number of cPanel accounts that the reseller creates. On the service’s next due date, the system records the current number of cPanel accounts and adds any additional cost to the service’s renewal invoice.
WHMCS Connect
This module supports WHMCS Connect. WHMCS Connect allows you and your administrators to quickly and easily access the control panels of all the servers configured in your WHMCS installation that support Single Sign-On, enabling you and your staff to administer and make changes without ever needing to re-authenticate.
Log in to cPanel
Log in to cPanel in the Client Area and Log in to Control Panel in the Admin Area use the server hostname if it is available. If it is not, they use the IP address.
- The use of
httporhttpslogin links depends on the Secure setting in the server configuration. - The link in the Admin Area uses the
xfercpanelfunction. When the system prompts you, enter your WHM login details (not the client’s cPanel details) to log in to the client’s account with reseller privileges.
API Token Permissions
API tokens in cPanel & WHM allow you to restrict the actions that an API token can perform.
To do this, you must grant the following permissions in WHM at Development » Manage API Tokens:
basic-whm-functions | basic-system-info | cpanel-api | create-acct | create-user-session |
suspend-acct | upgrade-account | kill-acct | passwd | acct-summary |
list-accts | show-bandwidth | cpanel-integration | list-pkgs | ns-config |
edit-mx | manage-api-tokens | ssl-gencrt |
- When creating an API token for the root user, you must also enable the
viewglobalpackagespermission. - When using the Configurable Package Addon, you must also enable the
edit-accountpermission. - When creating reseller products, you must enable the
Everythingpermission. The reseller API functions on cPanel & WHM servers requirerootaccess.
Keep DNS Zone on Termination
When terminating a cPanel & WHM account via the WHMCS Admin Area, select Keep DNS Zone to retain the associated DNS zone record. You may wish to use this, for example, when performing an account migration with DNS forwarding.
Disable Two-Factor Authentication
For the cPanel module to function when Two-Factor Authentication (2FA) is enabled for your account, you must disable the 2FA requirement for API requests.
To do this:
- Log in to WHM as the
rootuser. - Go to Security Center > Configure Security Policies.
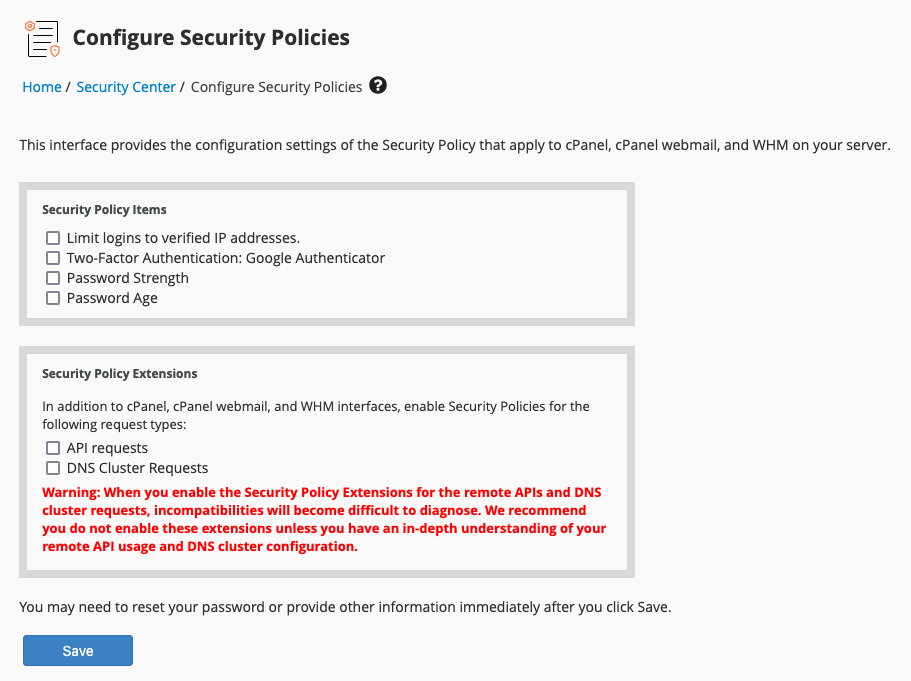
- Uncheck API requests.
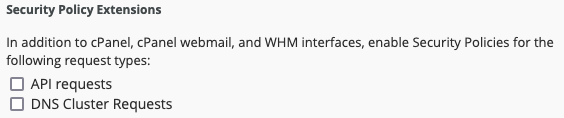
- Click Save.
Add-On Features
In addition to WHMCS’s existing product addon functionality (now an Independent Product), you can create an Add-On Feature. These addons let you sell module-specific features that are available through cPanel & WHM and Plesk, like WP Toolkit or Sitejet Builder.
Troubleshooting
You can find information about most hosting server and provisioning issues by reviewing recent messages at Utilities > Module Queue and in Module Log at Configuration () > System Logs.
You may encounter the following common issues with cPanel & WHM servers:
| Error or Issue | Cause | Next Steps |
Access Denied/Permission Denied | The cPanel & WHM or WP Squared server denied WHMCS access to perform the requested action. | Access Denied Errors |
Action Failed Unable to auto-login. Please contact support | The username under the client’s Products/Services tab is empty. | Action Failed Errors |
Sorry, a group for that username already exists | An account with this username already exists on the server. | Group Already Exists Errors |
Invalid value paper_lantern for the cpmod setting | The product configuration in WHMCS specifies a cPanel theme that does not exist on your cPanel server. | Invalid cpmod Errors |
Invalid numeric value | The product configuration in WHMCS specifies a cPanel theme that does not exist on your cPanel server. | Invalid Numeric Value Errors |
Key Generation Failed: (XID xxxxxx) You do not have the feature “sslmanager” | The cPanel hosting account does not have the required SSL/TLS-related permissions. | Key Generation Failed Errors |
This module requires a cPanel & WHM server with a valid license and the 'Standard' server profile. or This module requires a WP Squared server with a valid license and the 'WP Squared' server profile. | You are attempting to use a server that does not run the correct control panel or does not have a valid license. | License Profile Errors |
Login Failed | Your server configuration is incorrect or brute force protection settings are preventing access to the cPanel API. | Login Failed Errors |
No user name supplied: username is a required argument | The username under the client’s Products/Services tab is empty. | Missing Username Errors |
| The Package menu does not include all of the packages on your server. | Package use would exceed the reseller’s quotas on their WHM account. | Missing WHM Packages |
WHM Username is missing for the selected server | There is a server balancing misconfiguration. | Missing WHM Username Errors |
Registrar Error or CURL Error: 56 - OpenSSL SSL_read: Success or CURL Error: 56 - OpenSSL SSL_read: error:14095126:SSL routines:ssl3_read_n:unexpected eof while reading, errno 0 | System updates in EasyApache 4 are causing errors. | OpenSSL Registrar Errors |
Package Not Allowed or Exceeded Resource/Account Allocation | You only have reseller access to your server and are trying to create an account without a valid package name. | Package Not Allowed Errors |
You do not have permission to use Selected Package | The package name in WHMCS does not exactly match the package name in WHM. | Package Permission Errors |
Product attribute Package Name XXX not found on server | There are insufficient resources to create an account with this package, you entered the package name incorrectly, or an API token has insufficient permissions. | Product Attribute Errors |
Resellers are not permitted to create subdomains of the server's main domain | The domain is missing from the service configuration. | Reseller Subdomain Errors |
Sorry, that username is reserved | The username for the new account contains a prohibited word. | Username Reserved Errors |
Failed to load module “WpToolkitCli”: The system failed to load the module Cpanel::API::WpToolkitCli because of an error: Can't locate Cpanel/API/WpToolkitCli.pm in @INC (you may need to install the Cpanel::API::WpToolkitCli module) | The required WP Toolkit module does not exist on your cPanel & WHM server. | wptoolkitcli Errors |
Last modified: 2025 November 27