Helm 4
Contents
About this Module
The Helm module is only compatible with the discontinued server control panel (not the Kubernetes® package manager).
For our other Helm module, see Helm 3.
The Helm 4 module allows you to add and manage Helm 4 servers in WHMCS.
Supported Features
| Create | Suspend | Unsuspend | Terminate |
|---|---|---|---|
| Yes | Yes | Yes | Yes |
| Change Package | Change Password | Usage Updates | Client Area Link |
|---|---|---|---|
| Yes | No | No | Yes |
The following ports should be open for outbound connections from your WHMCS server: 8086
Adding a Helm 4 Server
To set up a Helm 4 server in WHMCS:
- Go to Configuration () > System Settings > Servers or, prior to WHMCS 8.0, Setup > Products/Services > Servers.
- Click Add New Server.
- Select Helm 4 from the menu.
- Enter the hostname or IP address and your credentials.
- Click Continue.
- Enter the additional desired server details.
- If your server uses a different port, check Override with Custom Port and enter the correct port. For more information, see Server Port Overrides.
- Click Save Changes.
- If this is the only Helm 4 server that is currently in WHMCS, click on the name and ensure that it results in an asterisk (*) next to it. This indicates that it is the default to use when any other non-specific configuration doesn't apply.
Creating a Helm 4 Product
You can create a product that provisions accounts on your Helm 4 server at Configuration () > System Settings > Products/Services or, prior to WHMCS 8.0, Setup > Products/Services > Products/Services.
To find your role ID:
- Log in to the Helm 4 server.
- Go to Account Settings > Customer Account Roles.
- Click the Excel download icon to get a list of roles and their IDs.
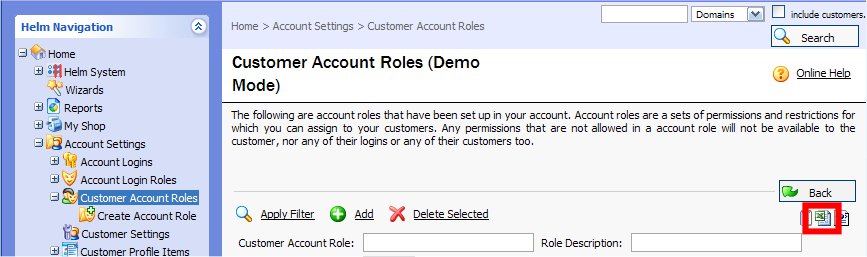

- Enter the necessary role IDs in WHMCS.
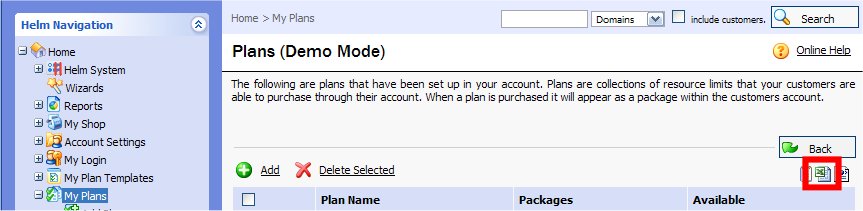
- Go to Account Settings > My Plans.
- Click the Excel download icon to get a list of plans and their IDs.


WHMCS Connect
This module does not support WHMCS Connect.
Troubleshooting
N/A
Server Modules
cPanel/WHM - DirectAdmin - Plesk - Helm 3 - Helm 4 - Ensim - InterWorx - WebsitePanel - Cloudmin
Lxadmin - Virtualmin Pro - XPanel - HyperVM - SolusVM - Cloudmin - WHMSonic - VPS.Net
CentovaCast - SCPanel - MediaCP - GameCP - TCAdmin - Reseller Central - Auto Release - Heart Internet
Registrar Modules
Enom - ResellerClub - Nominet - OpenSRS - ResellOne - OnlineNIC - PlanetDomain - Affordable Domains
TPP Wholesale - TPPInternet - Stargate - Namecheap - NetEarthOne - Bizcn - InternetBS - GMO Internet
12Register - Registercom - DotDNS - WebNIC - Dot.TK - HexoNet - Realtime Register - Registereu
RRPProxy - ResellerCamp - TransIP - Heart Internet - IPMirror - NetRegistry - OVH - VentraIP Wholesale
Email - 101Domain
Fraud Modules
MaxMind - VariLogiX FraudCall - Telesign
Gateway Modules
2CheckOut - AsiaPay - Auth.net Echeck - Authorize.net - Authorize.net CIM - Bank Transfer - BidPay
BluePay - BluePay Echeck - BluePay Remote - Boleto - CashU - CC Avenue - ChronoPay - Direct Debit
EMatters - E-Path - eProcessingNetwork - eWAY Tokens - F2B - Finansbank - GarantiBank - Gate2Shop
Inpay - InternetSecure - IP.Pay - Kuveytturk - Modulo Moip - Mail In Payment - Merchant Partners
Merchant Warrior - IDEALMollie - Moneris - Moneris Vault - Skrill 1-Tap - NaviGate - NETbilling
Netregistry Pay - NoChex - Offline Credit Card - Optimal Payments - PagSeguro - Payflow Pro - Pay Junction
Paymate AU and NZ - Payment Express - PayPal - PayPal Card Payments - PayPal Express Checkout
PayPal Payments - PayPal Payments Pro - PayPoint.net (SecPay) - Payson - Planet Authorize - ProtX VSP Form
PSIGate - Quantum Gateway - Quantum Vault - SagePay - SagePay Tokens v2 - SecurePay
SecurePay AU - Secure Trading - TrustCommerce - USA ePay - WorldPay - WorldPay Invisible