Security
The Security tab allows you to configure security-related features in WHMCS.
You can access this tab at Configuration () > System Settings > General Settings.
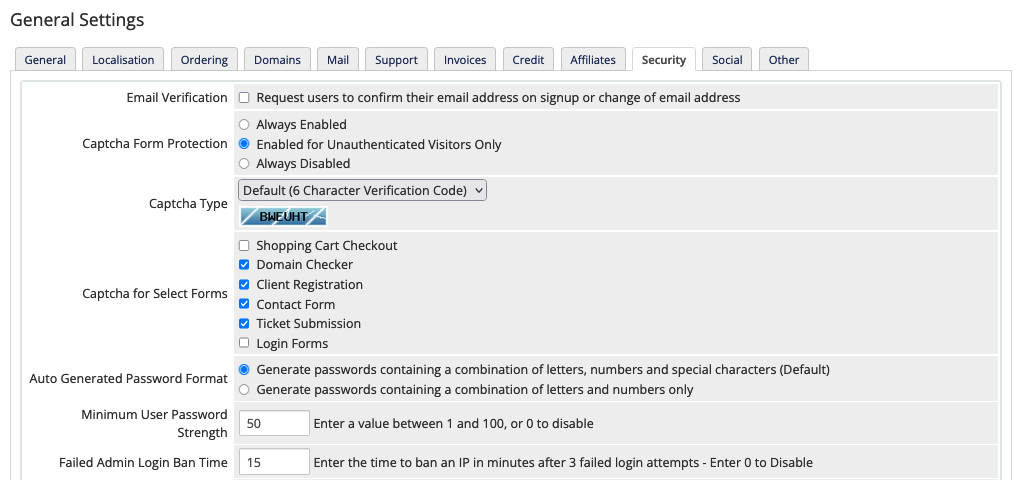
Email Verification
Whether to send an email verification notice each time that a user or admin creates a new client and each time that an existing client email address changes. The client must use the verification link in the email to confirm the new email address.
Captcha Form Protection
Whether to use captcha protection in the locations that you select for Captcha for Select Forms (below).
- Captchas can help prevent automated bots from placing orders, searching for domains, creating accounts or support tickets, using contact forms, and logging in to your Client Area and Admin Area.
- You can select whether captchas always perform verification (Always Enabled), only perform verification for unauthenticated visitors (Enabled for Unauthenticated Visitors Only), or never perform verification (Never Enabled).
Captcha Type
- We strongly recommend that you update your settings to use reCAPTCHA v3 or hCaptcha®. These captcha types include enhanced protection against automated captcha solvers.
- In order to use reCAPTCHA or hCaptcha®, you must register for a Google reCAPTCHA or hCaptcha account and enter a set of keys.
The captcha type to use. You can select the following captcha types:
| Option | Captcha Method | Description |
|---|---|---|
| Default (6 Character Verification Code) | Verification Code | Use a captcha that displays an image with six characters on a blue-striped background. This option does not require additional configuration using the settings below. This captcha type requires GD2 on your server. For steps to enable this captcha type, see Enable Default Captchas. |
| reCAPTCHA v2 | Checkbox | Use Google®’s reCAPTCHA v2 service. When you select this option, the reCAPTCHA Site Key and reCAPTCHA Secret Key settings will appear. |
| Invisible reCAPTCHA v2 | Invisible | Use the invisible version of Google’s reCAPTCHA v2 service. When you select this option, the reCAPTCHA Site Key and reCAPTCHA Secret Key settings will appear. |
| reCAPTCHA v3 | Invisible | Use the invisible version of Google’s reCAPTCHA v3 service. When you select this option, the reCAPTCHA Site Key, reCAPTCHA Secret Key, and reCAPTCHA Score Threshold settings will appear. For steps to enable this captcha type, see Enable reCAPTCHA v3. |
| hCaptcha | Checkbox | Use hCaptcha for captcha protection. When you select this option, the hCaptcha Site Key, hCaptcha Secret Key, and hCaptcha Score Threshold settings will appear. For steps to enable this captcha type, see Enable hCaptcha. |
| Invisible hCaptcha | Invisible | Use the invisible version of hCaptcha for verification. When you select this option, the hCaptcha Site Key, hCaptcha Secret Key, and hCaptcha Score Threshold settings will appear. For steps to enable this captcha type, see Enable hCaptcha. |
reCAPTCHA Site Key
Your reCAPTCHA site key. You can find this key in your Google account.
reCAPTCHA Secret Key
Your reCAPTCHA site secret key. You can find this key in your Google account.
reCAPTCHA Score Threshold
- This setting only displays if you selected reCAPTCHA v3 for Captcha Type.
- hCaptcha and reCAPTCHA v3 both use score thresholds, but their scoring systems are inverted. Make certain that you use the correct score threshold for your captcha type.
The desired minimum score for reCAPTCHA verification. You can enter a value between 0 (least restrictive) and 1 (most restrictive).
This value defaults to 0.5.
hCaptcha Site Key
Your hCaptcha site key. You can find this key in your hCaptcha account.
hCaptcha Secret Key
Your hCaptcha site secret key. You can find this key in your hCaptcha account.
hCaptcha Score Threshold
- This setting only displays if you selected an hCaptcha option for Captcha Type.
- hCaptcha and reCAPTCHA v3 both use score thresholds, but their scoring systems are inverted. Make certain that you use the correct score threshold for your captcha type.
The desired minimum score for hCaptcha verification. You can enter a value between 1 (least restrictive) and 0 (most restrictive).
This value defaults to 0.5.
Captcha for Selected Forms
The locations in which you want captchas to appear. You can select from the following locations:
- Shopping Cart Checkout — On the checkout page in the Client Area.
- Domain Checker — On the domain checker on the Client Area Homepage and when registering and transfering domains in the Shopping Cart.
- Client Registration — On the
register.phppage. - Contact Form — On the
contact.phppage. - Ticket Submission — On the support ticket creation page.
- Login Forms — On the Admin Area and Client Area login pages.
Auto Generated Password Format
The desired complexity of passwords that WHMCS generates for newly-provisioned services.
- The default complexity consists of 14 characters that contain uppercase and lowercase letters, numbers, and symbols.
- To reduce the complexity of generated passwords, you can choose to generate passwords that only use combinations of letters and numbers.
Minimum User Password Strength
The desired password strength for user passwords. Set this to 0 to disable the password strength check on the order form.
To reach a password strength of 100, the user must enter a password that contains five or more characters, contains one symbol, and contains one uppercase letter or number.
/assets/js/PasswordStrength.js file.Failed Admin Login Ban Time
A number of minutes before users can try again after failed login attempts. By default, WHMCS blocks any visitor IP addresses that attempt to log in to the Admin Area with a valid username and incorrect password three or more times.
- The default length of this ban is 15 minutes. This helps to prevent hackers from endlessly trying different password combinations in order to gain access to your Admin Area (dictionary attack protection).
- Set this to
0to disable the login ban feature. The system will never attempt to ban IP addresses and the user will be able to continue to attempt to log in endlessly. - We recommend a minimum value of
1.
Whitelisted IPs
IP addresses that you want to whitelist. The system will never ban these IP addresses from accessing the Admin Area due to login failures. For example, you may wish to whitelist your office’s IP address.
Whitelisted IP Login Failure Notices
Whether to suppress notifications for failed logins from whitelisted IP addresses. If you disable this option, the system will send notification emails to admins with the Full Administrator admin role whenever a login fails, even if the login is from a whitelisted IP address.
Disable Admin Password Reset
Whether to remove the Forgotten Password link on the Admin Area login page.
Delete Encrypted Credit Card Data
Click Delete to delete all locally-stored encrypted credit card data from the database. This will not delete remote gateway tokens.
Delete Encrypted Bank Account Data
Click Delete to delete all locally-stored encrypted bank account data from the database.
Allow Client Pay Method Removal
Whether to allow clients to delete payment methods from their accounts. If you enable this setting, an option will appear in the Shopping Cart and Client Area to store payment details as a saved pay method for faster future checkouts.
- If you disable this, only admins can delete credit card details.
- We recommend enabling this option.
Disable Session IP Check
Whether to disable session IP checks. Session IP checks protect your WHMCS installation from cookie or session hijacking, but can cause problems for users with dynamic IP addresses or who use mobile devices.
Proxy IP Header
The HTTP header that WHMCS will use to find the IP address that is the authoritative IP address for the request. Most proxies use X_FORWARDED_FOR, allowing you to leave this setting blank.
Trusted Proxies
The IP addresses and IP address CIDR ranges of trusted proxies or other forwarding services. WHMCS will check the header to discover the actual canonical IP address of inbound traffic.
- To add an IP address or IP address range, click Add IP, enter the address or range and any notes, and click Add IP.
- To remove an IP address or IP address range, select the desired list item and click Remove Selected. To remove multiple addresses, press
Control(for Windows®) orCommand(for Mac®) and single-click the proxies that you want to remove.
You may need to configure this setting if your WHMCS installation:
- is behind a proxy you control.
- is behind a load balancer or firewall that modifies HTTP requests.
- receives HTTP requests from a proxy or DDOS protection service like Cloudflare® or BlackLotus.
- is behind infrastructure that can modify the information in the link layer of a request.
These types of deployment setups will alter the value from the originating IP address to their own IP address. This is expected behavior because it is part of standard network specifications. Unfortunately, this also makes it look as if your client logins, admin logins, and orders are all coming from the proxy instead of the real location. When this happens, the location is masked for logging, access authorization, fraud detection, or other IP address-related purposes.
API IP Access Restriction
The IP address of the off-server location from which you use the WHMCS API, if you use it in an off-server location. Entering the IP address here preserves your continued access.
Log API Authentication
Whether to log successful authentications via the API in the Admin Log at Configuration () > System Logs. By default, the system does not log these authentications.
CSRF Tokens: General
Whether to prevent malicious visitors from forging form posts to try to gain access to your WHMCS installation.
CSRF Tokens: Domain Checker
Whether to use CSRF tokens for the domain checker in the Client Area. This allows you to send domain information to WHMCS from an external page (for example, using the domain checker integration code on your website). By default, CSRF tokens are disabled for the domain checker.
If you are not using the integration code, you can enable this option and visitors will only be able to use the built-in domain checker pages.
Last modified: 2026 April 30