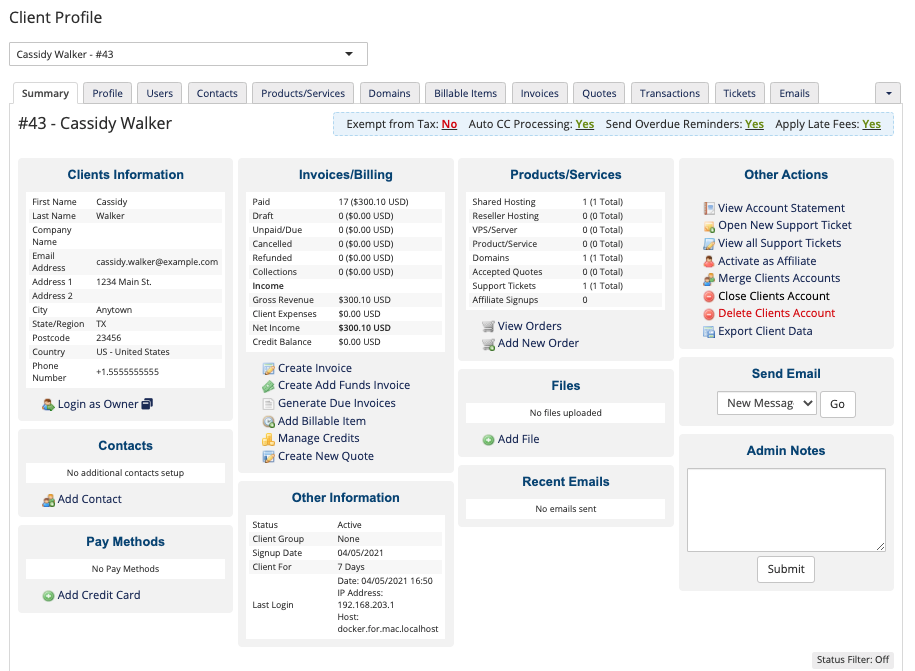
Summary Tab
The Summary tab contains an overview of the client’s details, billing and service statistics, quick links to many common management actions, and a list of all their services, domains, and addons.
You can access this tab when you view a client’s profile at Clients > View/Search Clients.
Actions
The top-left corner of the page displays the client’s unique ID number and name. To the right, summary actions allow you to manage billing-related settings.
Click the click Yes (green) or No (red) to instantly toggle the status of these options:
- Exempt From Tax — Do not charge tax, even if the client has a tax rule.
- Auto CC Processing — Automatically charge the client’s stored credit card on invoice due dates.
- Send Overdue Reminders — Send overdue reminder emails when the client’s invoices become overdue.
- Apply Late Fees — Charge a late fee when the client’s invoices become overdue.You must activate and configure late fees in Configuration () > System Settings > Automation Settings and in the Invoice tab at Configuration () > System Settings > General Settings.
Clients Information
This section displays the client’s contact information, including their name, email address, mailing address, and phone number.
- Click Reset & Send Password to generate a new Client Area password for the client and email it to them.
- To change or reset the user’s password, use the client profile Users tab.
- Users can also request a password reset by clicking Forgotten Password on the login form.
For more information, see Reset a User Password. - Click Login as Owner to log in to the Client Area exactly as the account’s owner would see it.
- Clicking the linked text will open the Client Area in your current tab, or you can click the window icon to open the Client Area in a new tab.
- When you access the Client Area in this way, you can also perform actions on the account owner’s behalf, like placing orders or opening tickets.
- When you are finished, click Return to Admin Area in the top-right corner to return to the Admin Area.
Contacts
This section lists the client’s contacts or sub-accounts.
- Click a name to edit that record in the Contacts tab.
- Click Add Contact to create a new contact for this client.
Pay Methods
This section displays an overview of the client’s current registered payment methods in WHMCS. The default Pay Method will always at the top of the list, and be indicated via an icon.
You can add a new payment method by clicking Add Credit Card or Add Bank Account.
If you have activated multiple payment gateways that include a combination of local card storage and tokenized storage, the system will prompt you to select a storage method when you add a credit card. In most cases, we recommend using tokenized storage for card data if it is available.
You can manage a pay method by clicking on it in the list:
View Locally-Stored Credit Card Numbers
To view the associated locally stored credit card number (local encryption), click the lock icon and enter your credit card encryption hash, which you can find in the configuration.php file.
Removing Card Details
Click Delete to remove the card’s details from the client and WHMCS.
If an error occurs while you are deleting a remote payment method, or if the gateway for a remote payment method is deactivated, WHMCS cannot delete the record. When this happens, an error will display with the option to ignore it and force deletion of the payment method.
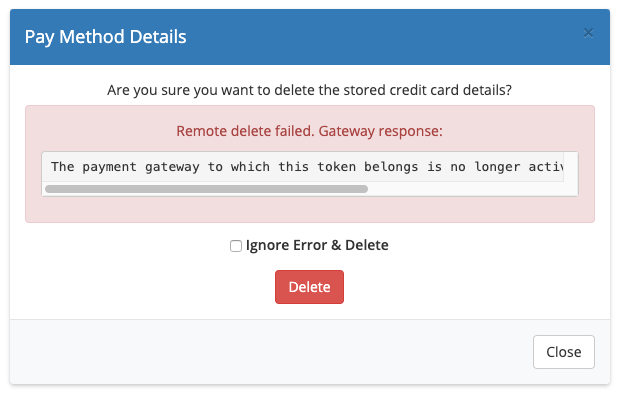
Forcibly deleting a payment method will not run anything on the remote gateway system. If this occurs, you must remove any records in the payment gateway account manually.
Invoices/Billing
The Invoices/Billing section displays invoice and billing statistics, including the number of invoices in each status and the total value for each status in parentheses:
- Paid — The number of invoices and their total invoice amount in the Paid status.
- Draft — The number of invoices and their total invoice amount in the Draft status.
- Unpaid/Due — The number of invoices and the total amount due in the Unpaid status. The total is the outstanding amount of the invoices.
- Cancelled — The number of invoices and their total invoice amount in the Cancelled status. The total does not include any payments that the client has already made.
- Refunded — The number of invoices and their total invoice amount in the Refunded status. The total does not include any payments that the client has already made.
- Collections — The number of invoices and their total invoice amount in the Collections status. The total does not include any payments that the client has already made.
Under Income, you can view the following additional totals:
- Gross Revenue — The total of all transactions that the client has already paid.
- Client Expenses — The total of all transaction fees and refunded transactions.
- Next Income — The total after subtracting Client Expenses from Gross Revenue.
- Credit Balance — The client’s current credit balance.
Create Invoices
Click Create Invoice to create a custom invoice. This immediately creates an empty invoice that you can add line items to. Clicking will not send an email to the client.
Click Create Add Funds Invoice to create an invoice that deposits funds (credit) to a client’s account or charges a specific amount from a client’s credit card. The system will prompt you to enter the desired amount, and then it will send an email to the customer with a link to pay the invoice.
For more information, see Invoices and Credit Balances.
Generate Due Invoices
Click Generate Due Invoices to generate any invoices due for the client’s services, billable items, domains or addons. You may wish to use this if, for example, you have modified a billable item and need to generate new invoices without running the entire automation cron job.
The system will prompt you to choose whether to send the invoice notification email.
For more information, see Invoices.
Add Billable Item
Click Add Billable Item to go directly to Billing > Billable Items.
Manage Credits
Click Manage Credits to view the history of the client’s credit balance. You can also add and remove credit or delete entries.
Create New Quote
Click Create New Quote to go directly to Billing > Quotes.
Other Information
The Other section includes information about the client’s status, their client group, signup date, length of time since signup, and the IP address, hostname, and time of their last login.
Products/Services
The Products/Services section displays all of the services, domains, quotes, support tickets, and affiliate signups for the client. For each item, the active service count displays first, with the total services (included suspended, terminated, and cancelled services) in parentheses.
- Click View Orders to see a list of all of the client’s orders.For more information, see Order Management.
- Click Add New Order to create a new order on behalf of the client. When you create an order in the Admin Area, you can use products and promotional codes that may not be available from the Client Area.
Files
The files section in a client’s summary allows you to upload files that are specific to that customer, like documents, agreements, or special downloads.
- Enable Admin Only to cause files to only be available for admins to view. Otherwise, they are also available from the Client Area Homepage for that client.
- The system stores files in the
/attachmentsdirectory.
Recent Emails
The Recent Emails section displays the last five emails that WHMCS sent to the client. You can view a longer email history in the client profile **Emails tab.
Other Actions
You can perform a variety of other actions in the Other Actions section.
View Account Statement
Click View Account Statement to view a statement of account for this client for a specified date range. It includes the type (add funds, transaction, invoice), date, description, credits, debits, and a running balance.
Open New Support Ticket
Click Open New Support Ticket to open a support ticket under the client’s account. This is useful for initiating correspondence with the client and keeping a full record of the conversation.
View all Support Tickets
Click View all Support Tickets to see see a list of all support tickets for the client. This list only includes tickets for support departments that the currently-authenticated admin has permission to view.
Activate as Affiliate and View Affiliate Details
If the client is not already in the affiliate program, click Activate as Affiliate to add them.
If the client is already in the affiliate program, click View Affiliate Details to view the client’s referrals, commissions, and commission payments.
Merge Client Accounts
Click Merge Client Accounts to merge two clients in WHMCS. This merges everything relating to the two separate entities (for example, invoices, services, transactions, and support tickets) into one single entity.

To do this:
- Enter the other client’s client ID. If you don’t know the client’s ID, search for their name, company or email address in Enter Name, Company or Email to Search. Click the client’s name and the system will automatically fill in the ID for Second Client ID.
- Choose which profile you want to keep (the client you want to merge the other client’s data into).
- Click Submit.
Close Clients Account
Closing a client’s account will prevent users from accessing that client when they log in or selecting them on the Choose Account page.
This link will also change the status of Unpaid invoices to Cancelled and will change all services to Cancelled. It will not run any module termination functions.
Delete Clients Account
To remove a client:
- Click Delete.
- If you also want to remove any associated users that aren’t associated with other client accounts, check the checkbox.
- Confirm the deletion.
Deleting a client removes everything for that client from the WHMCS database, with the exception of transactions. Transaction data remains because they represent income that the system is not refunding. If you want to also remove the client’s transactions, do this in the Transactions tab before you delete the client.
Export Client Data
Click Export Client Data to go to the Client Data Export report at Reports > Reports.
- The system will preselect the current client.
- From this report, you can download selected client data as a
.jsonfile.
Send Email
Use this menu to send email to clients. You can send General email templates or compose custom messages for the individual client.
To send an email:
- Select the desired item from Send Email:
- To send an existing email template, select that email template.
- To send a custom email message, select New Message.
- If you selected New Message, compose your message. If you want to reuse the message again in the future, select Save Message.
- Click Send Message.
For more information, see Emailing Clients.
Admin Notes
Use the Admin Notes section to enter private notes about the client.
Services, Addons, Domains, and Quotes
The Services, Addons, Domains, and Quotes lists provide a comprehensive list of all the client’s services. They include information like the price, signup date, status, and next due date, and display according to the item’s ID number.
The Current Quotes section displays quotes with a Valid Until Date up to and including today’s date. After this date, you can view them in the Quotes tab.
Status Filter
You can filter the services, addons, domains, and quotes that display in these lists by clicking Status Filter and selecting the statuses that you want to view.
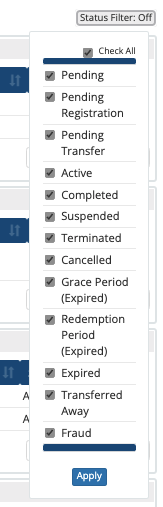
This filter will apply to all clients until the next time that you close your browser session. After the system has applied the selected filter, Status Filter will display in green.
Bulk Actions
You can select items from the lists and apply bulk actions to them. This includes making changes to statuses, payment methods, pricing, billing cycles, or next due dates. You can also override automatic suspension settings.

You can also perform all the core module commands, including Create, Suspend, Unsuspend, Terminate, Change Package, and Change Password.
To do this:
- Select the products, services, addons, and domains that you want to update.
- Under Bulk Actions, click Advanced Options.
- Make your changes and selections.
- Leave anything that you don’t wish to change blank.
- If you are updating the Next Due Date value, you can check Create Prorata Invoice to generate prorata invoices. For more information, see Due Date Change Prorata Calculation below.
- Click Apply.
Due Date Change Prorata Calculation
When making a change to the Next Due Date of products and services, you also have the option to bill for the days between the current next due date and the target next due date you set. To do this, select Create Prorata Invoice.
- The system will only generate an invoice if the differences for all products result in an amount being due.
- This is useful for synchronizing multiple different products to a single common due date each billing cycle.
Invoice Selected Items
There may be times where a client asks for you to invoice them for the next renewal date early. To do this, check the checkboxes for the desired products, services, addons, and domains and then click Invoice Selected Items.
- This may create multiple invoices if the due dates and payment methods differ. This is because this process continues to obey the usual invoicing rules.
- You cannot generate another invoice if an invoice has already been made for the next due date.
If you select multiple items with the same Next Due Date and Separate Invoices is enabled in the client’s profile or client group, it will not apply and all possible items will be invoiced together. To split them, edit the resulting invoices and click Split Invoice.
Delete Selected Items
Check the checkboxes next to the services, domains, addons, or quotes that you wish to remove and click Delete Selected Items to delete multiple items at the same time.
This will remove the record from WHMCS but will not trigger any module commands (for example, the hosting account for a service will stay on the server).
Last modified: 2026 April 30