Invoice Management
The lists of invoices allow you to view and search all of the invoices in your WHMCS installation.
You can view lists of invoices at Billing > Invoices.
Create an Invoice
WHMCS automatically generates invoices for recurring products and services. You can also manually create custom one-time invoices for specific clients.
To manually create a one-time custom invoice for a specific client:
- Use one of the following methods to create the draft invoice. The system will create a new invoice in the Draft status.
- From the client’s profile’s Summary tab, click Create Invoice.
- From anywhere in the Admin Area, click the + icon at the top of the interface and choose New Invoice.
- Choose a client.
- Enter invoice and due dates.
- Select a payment method.
- Click Create Invoice.
- To configure the invoice’s details:
- Update the desired settings in the Options tab.
- Click Save Changes.
- Under Invoice Items, for each invoice item that you wish to add:
- Enter a description and amount.
- Click Save Changes. A new row will then appear to allow adding further line items.
- To publish the invoice, choose the Summary tab and click a publishing option. These options only display when the invoice is in the Draft status, and clicking them will set Invoice Date to the current date:
- Publish & Send Email — Convert the invoice to the Unpaid status and send the Invoice Creation email to the customer.
- Publish — Convert the invoice to Unpaid without notifying the customer.
You can navigate away from the invoice at any time during this process and return to it later. WHMCS will store the invoice as a draft and it will not be visible to the customer until you have published it.
Find and View Invoices
To find and view invoices, use the following methods:
- Search by invoice number in the top-right corner of the Admin Area ().
- Search using advanced search options, including searching by line item descriptions, using the list at Billing > Invoices.
- View all of the client’s invoices in the Invoices tab of their client profile.
Click the invoice ID or click View in the list of invoices to view the desired invoice.
Invoices default to view-only mode. This decreases the risk of unintentional edits while viewing or paying client invoices.
- Admins who have the Manage Invoices permission can:
- Click Manage Invoice to edit invoices in Draft status.
- Click Edit while viewing a list of invoices to skip view-only mode and go directly to editing the invoice.
- Admins who have the View Invoice permission can view invoices, add payments and credit, issue refunds, and add notes if they have the correct permissions for these tasks. They cannot edit invoice contents.
Invoice Immutability
To facilitate tax law compliance and provide accurate audit trails in your system, invoices become immutable after they leave the Draft status. Due to this, you cannot directly perform any edits on published invoices.
When you need to make changes to a published invoice, the system uses one of these approaches:
- Credit and Debit Notes — The system automatically creates these notes when you perform actions like refunds, cancellations, or applying credit. They adjust the invoice balance while preserving the original invoice.
- Reissuing Invoices — For changes to immutable fields like invoice date or tax rate, you must duplicate the invoice, make changes to the draft, publish it, and cancel the original.
Invoices
The Invoices interface includes the following sections:
- Invoice Items – A list of the products and services on the invoice and the total amount due.
- Ledger – A list of all of the financial activity for an invoice, including the original invoice charges, payments that the system has received, credit and debit notes, and the invoice’s current balance.
- Transaction History – A list of all attempted payments on the invoice. This includes successful and failed payment attempts.
You can view the information for an invoice and perform many actions using several tabs:
Summary
The Summary tab lists the client name, invoice and due dates, invoice items, and associated transactions, and allows you to send client emails.
Send Invoice-Related Emails
To send an email for the selected invoice, choose the desired email template from the menu under the invoice status and click Send Email.
Cancel an Invoice
To cancel an invoice, click Mark Cancelled under the invoice status.
- When you cancel an invoice, the system will prevent payment of the invoice. The invoice total will move to Cancelled status in the client’s profile’s Summary tab.
- Cancelling an invoice does not directly affect the associated services.
- Canceling an invoice requires the Cancel Invoice permission.
- The system cron can automatically cancel invoices after they have been overdue for a specified number of days. You can enable this setting and set the number of days in the Billing Settings section at Configuration () > System Settings > Automation Settings.
- You must have the Manage Invoices permission and click Manage Invoices in the top-right corner while in view-only mode to perform this action.
- For more information, see Billing Logic.
Split to New Invoice
Splitting invoices allows you to separate line items from an invoice into a separate invoice. This is useful if, for example, items appear together on a single invoice that a client wants to renew separately or a merge happened incorrectly.
To split items, select the desired items under Invoice Items and then choose Split to New Invoice from With Selected. The system will immediately move all of the items to a single new invoice.
- This process does not send an email to the customer. If you want to notify the customer, click Send Email.
- When splitting an invoice, the system sets the due date of the resulting invoice based on the current date and Invoice Generation settings in Configuration () > System Settings > Automation Settings.
Delete
To delete items from an invoice, select the desired items under Invoice Items and then choose Delete.
Add Payment
If you receive a payment that the system hasn’t automatically logged in WHMCS, you will need to manually apply it to the invoice.
To do this, enter the details corresponding to the payment, including the date, payment method, transaction ID, and amount. Then, click Add Payment.
- If a payment is not for a specific invoice, issue credit to the client instead.
- If a payment applies to multiple invoices, add a transaction at Billing > View Transaction List. For Invoice ID(s), enter a comma-separated list of all of the invoice numbers to apply payment to.
- The system will apply payments in the order you enter them until the client has used the full amount.
- The system will automatically add any amount left over as a credit to the user for use on future invoices.
Options
In the Options tab, you can configure the following invoice settings:
| Setting | Description | Immutable After Draft Status |
|---|---|---|
| Invoice Date | The date on which the system generated the invoice or you created it. | ✓ |
| Payment Method | The payment method that the system will attempt to use to pay the invoice. | |
| Invoice # | The invoice number. | ✓ |
| Due Date | The invoice’s due date. You cannot modify this value for invoices in the Paid, Refunded, or Cancelled statuses. | |
| Tax Rate | The rate at which the system will tax the items in the invoice. | ✓ |
| Status | The invoice status. You cannot modify this value for invoices in the Paid, Refunded, or Cancelled statuses. |
Credit
In the Credit tab, you can add or remove credit from the invoice.
Automatically-generated invoices always check whether a client has a positive credit balance. If they do, the system automatically applies the credit to the invoice during invoice generation. If applying credit reduces the invoice balance to 0, the system marks the invoice Paid automatically.
- Credit and debit notes appear in the invoice’s Ledger section.
- You must have the Create Credit or Debit Note permission for the system to apply a credit or debit note to the invoice.
- For more information, see Credit and Debit Notes.
Add Credit
To add credit from a client’s balance to an invoice, enter the desired amount under Add Credit to Invoice and click Go.
When you apply credit from a client’s balance to an invoice, the system creates a credit note for that amount. This reduces the invoice balance while maintaining a record of the adjustment.
Remove Credit
To remove credit from an invoice, enter the desired amount under Remove Credit from Invoice and click Go.
When you remove previously applied credit from an invoice, the system creates a debit note for that amount. This increases the invoice balance back to its previous state.
Refund
In the Refund tab, you can refund transactions for the invoice. Refunding transactions allows you to issue credits and refunds for payments that clients have made.
When you issue a refund on a Paid invoice, the system automatically creates a credit note for the refund amount.
- The balance may become negative if the system previously marked the invoice as fully paid.
- Credit and debit notes appear in the invoice’s Ledger section.
- Refunding an unpaid (partially paid) invoice does not create a credit note.
- You must have the Create Credit or Debit Note permission for the system to apply a credit or debit note to the invoice.
- For more information, see Credit and Debit Notes.
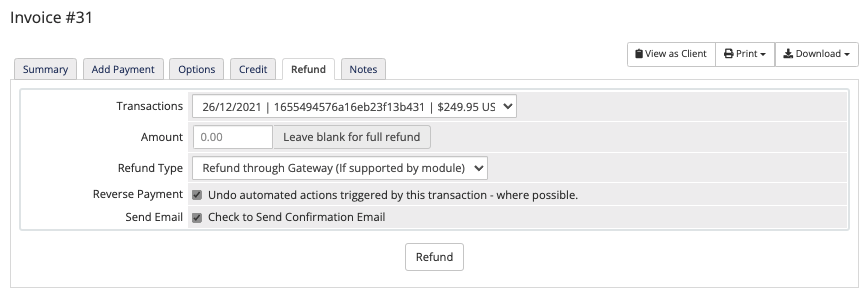
Refund a Transaction
To refund a transaction:
- If there have been multiple transactions for the invoice, select the desired transaction from the Transactions menu.You can only refund one transaction at a time, and the refund amount cannot exceed the total amount of the transaction.
- For Amount, enter the amount to refund for a partial amount. Otherwise, leave this blank to refund the entire transaction value.
- Select the desired type from Refund Type:
- Refund through Gateway — If your payment gateway supports refunds, WHMCS sends the refund to your gateway to process. This returns the money to the payment method that the client used.
- Manual Refund Processed Externally — WHMCS records a refund in the system. You must then process the refund separately with your payment gateway. You may also use this if a chargeback or dispute occurs.
- Add to Client’s Credit Balance — WHMCS records a refund and adds the refunded balance to the client’s credit balance. This does not return any money to the customer.
- Check Reverse Payment if you want to reverse the effects of the original payment (for example, when you set the invoice status to Collections and reverse the service’s Next Due Date.
- When you check this, the system’s actions depend on the configuration in Configuration () > System Settings > Automation Settings.
- This setting does not alter the system’s treatment of any affiliate commissions (see the steps below).For more information, see Payment Reversals.
- If you do not want to send a refund confirmation email, uncheck Send Email.
- Click Refund.
Reversing Affiliate Commission
If the transaction is associated with an affiliate commission and the payment gateway supports reversals, WHMCS can also reverse the commission.
- When you perform a full refund, WHMCS automatically reverses all of the associated commissions.
- When you perform a partial refund, WHMCS will ask you whether to also reverse the commission. You cannot, however, choose an amount of the commission to reverse. This action reverses the entire amount.
- If you choose not to perform a commission reversal, the commission payment will not be affected. The page will reload and display the results of the refund attempt if you chose Refund through Gateway. If it fails for any reason, the Gateway Log can provide more information.
Notes
Use the Notes tab to enter notes about the invoice.
Last modified: 2026 February 19