SolusIO
Our SolusIO Integration is the official integration between WHMCS and the SolusIO Virtual Infrastructure Management Platform.
The module allows customers to register for and manage VMs and provisioning in the SolusIO control panel. It also provides post-pay (pay after use) billing at set intervals.
- WHMCS does not include this addon module by default.
- For more information and current release data, see SolusIO on the WHMCS Marketplace.
Activation
You will need to download and upload the module before you can activate the addon through the Admin Area.
To do this:
- Download the latest version of the addon.
- Extract the ZIP file.
- Upload the
solusiodirectory to the/modules/addonsfolder of your WHMCS installation. - Go to Configuration () > System Settings > Addon Modules.
- Click Activate for SolusIO.
- Click Configure.
- Select the admin role groups that will have access to this addon.
- Click Save Changes.
Using the Addon
You can access the SolusIO module within WHMCS at any time by navigating to Configuration () > System Settings > Addon Modules within the WHMCS Admin Area.
Connecting to SolusIO
To connect to SolusIO:
- Access SolusIO. When you do this for the first time, you will see the following page:

- Enter the URL to your SolusIO installation. This is the URL that you use to access the web interface.
- Enter your API Key. You can find this at Account () > API Tokens > Generate API Token in the SolusIO user area.
- Click Test Connection to verify that you can establish a connection with the SolusIO system.
Post-Pay Billing
You can set your settings for post-pay billing in the Post-Pay tab.
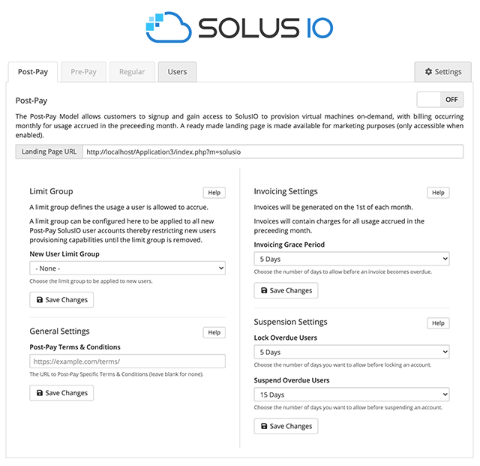
You can configure the following post-pay settings:
| Setting | Description |
|---|---|
| New User Limit Group | Select the limit group to apply by default to all new post-pay users. You must create and define limit groups within the SolusIO control panel. |
| Post-Pay Terms & Conditions | Enter a URL to the terms and conditions for the post-pay billing service for SolusIO. Use this to provide additional terms for the invoicing and payment of post-pay service usage. This setting is optional. |
| Invoicing Grace Period | Enter the number of days to allow after generation before an invoice is overdue. |
| Lock Overdue Users | Enter the number of days to allow before locking a user account in SolusIO. This is the number of days from the due date. |
| Suspend Overdue Users | The number of days to allow before suspending a user account in SolusIO. This is the number of days from the due date. |
Settings
The Settings tab allows you to modify connection and pricing settings.
Post-Pay Token Pricing
You must set token pricing for each active currency within WHMCS.
- You can set token pricing with up to four decimal places.
- Enter prices as the total price in each currency for one unit of token usage.
API Connection
The API Connection panel can modify and update the installation URL and API key at any time.
To make a change, enter the installation URL and an API key and then click Test Connection. If a connection is successful, WHMCS will update the URL and API key that it uses.
Client Area
After you enable post-pay billing, you will be able to access a premade SolusIO landing page and associated menu items in the Client Area.
You can access the landing page by clicking Cloud Hosting in the main store menu and in the Website & Security menu (for authenticated users).
User Signup
With post-pay billing, purchases and orders are not necessary in order to sign up. Users can sign up or activate their SolusIO user accounts on the provided landing page.
Signups use the following process:
- The user requests creation of an account for VM provisioning.
- The user enters their name, company, email address, and a desired password.
- The user receives an email containing a link to complete the signup process.
- The user clicks the link and agrees to your Terms ofService and (optionally) Post-Pay Terms & Conditions.
- SolusIO provisions the user account.
Users can then access SolusIO at any time via a provided SSO link in the Client Area homepage.
Accessing SolusIO
With Post-Pay, customers use the SolusIO control panel to provision and manage virtual machines. The Client Area homepage will show one of the following panels, depending on the user’s current SolusIO enrollment status:
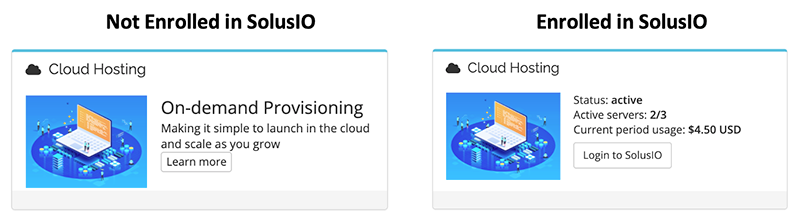
Enrolled users can click Log in to SolusIO to access the SolusIO control panel via automated single sign-on.
Unenrolled users can use a shortcut to the provided landing page to learn more and sign up.
Customizing the Landing Page
Customizable templates control the landing page. To make changes, we recommend copying the /modules/addons/solusio/templates/post-pay/landing-page.tpl file to the WHMCS Client Area template directory at /templates/example_template/modules/addons/solusio/post-pay/landing-page.tpl, where example_template is your active template in your WHMCS installation.
After you copy the file, you can make changes to the template within the Client Area template directory. The system will preserve these customizations during module updates.
Billing and Invoicing
SolusIO tracks the uptime of every virtual machine. It bills uptime at the hourly rate of tokens that you define within the SolusIO software.
When it becomes time to generate an invoice, WHMCS will request the uptime totals for each user from the SolusIO system. It creates an invoice with an itemized list of resources (aka virtual machines) and the amount due. The amount due is the token usage value in the SolusIO system multiplied by the token pricing in WHMCS.
Invoice Generation
The system generates invoices on the first of each month for all accrued usage in the immediately preceding month. For example, on August 1, it will generate invoices for usage by all users in the month of July.
Billing Integration
Billing integration allows SolusIO to retrieve token pricing information and perform single sign-on into the WHMCS billing portal.
WHMCS will automatically configure these values for you every time the WHMCS SolusIO module and SolusIO target instance establish a connection. You cannot generate and set these values manually.
To reconfigure the connection, you must reestablish the API connection. For more information, see API Connection above.
Billing Cron Task
A cron task manages invoice generation and user management. The system executes the cron task automatically once per day, and you can trigger it manually using the following command:
php crons/cron.php do --SolusioAutomation -vvv
Troubleshooting
Last modified: 2026 April 30