WordPress Hosting
You can easily offer automated WordPress® hosting for your clients. They will be able to purchase fully-configured WordPress installations with quick access from within the WHMCS Client Area. WHMCS leverages WP Toolkit to offer automated WordPress hosting.
- This feature is only available for use with WHMCS’s Plesk and cPanel server modules.
- You must be running an up-to-date version on which you have enabled and properly configured WordPress. In cPanel & WHM, you must also ensure that you use a compatible hosting plan.
- For more information, see cPanel WP Toolkit and Plesk WP Toolkit.
- You can also sell WordPress hosting using dedicated WP Squared servers. For more information, see WP Squared Hosting.
Setting Up WordPress Hosting Products
To get started with WHMCS’s WordPress automation, set up a WordPress hosting product:
- Go to Configuration () > System Settings > Products/Services.
- Click Create a New Product.
- Choose the desired product settings and module.
- Click Continue.
- Select the Module Settings tab.
- Make certain that you have selected the correct module and package settings.
- From the first Install WordPress menu, select one of the following options:
- Allow Admin Installation — Allow admins to install WordPress via the WHMCS Admin Area.
- Don’t Allow Admin Installation — Do not allow admins to install WordPress via the WHMCS Admin Area.
- From the second Install WordPress menu, select one of the following options:
- Allow Client Installation — Allow users to install WordPress via the WHMCS Client Area.
- Don’t Allow Client Installation — Do not allow users to install WordPress via the WHMCS Client Area.
- From the third Install WordPress menu, select one of the following options:
- Install Automatically — Automatically provision a WordPress installation while creating the hosting account.
- No Automatic Installations — Do not provision a WordPress installation while creating the hosting account.
- If you selected Install Automatically, the following additional settings will appear. For each setting, enter the necessary value or click Create Custom Field:
- Blog Title — The title to use for the provisioned WordPress installation.
- WordPress Path — The directory in which you want to install WordPress.
- Admin Password — The admin password.When you click Create Custom Field, WHMCS will save your settings, the page will reload, and a new custom field will be available in the Custom Fields tab. This allows clients and admins to specify values for each item prior to provisioning.
- You cannot enter a value here to set a default password. You must click Create Custom Field and allow admins or clients to set the password or WHMCS can generate passwords for each purchase. For more information, see Admin Passwords below.
- You cannot customize the admin username, which defaults to
admin.
Do not rename custom fields that you create in this way.
- Configure the remaining product settings in this and other tabs.
- Click Save Changes.
Admin Passwords
Creating a custom field for the admin password allows you or the client to create an admin password during the ordering process. By default, if you do not set an admin password or allow the client to set one during purchase, WHMCS will automatically generate one.
The WordPress Welcome Email template will contain the entered or generated password:
- If you or the client set the password, WHMCS will mask it in the email.If you set the password, you will need to communicate that password to the WordPress account owner (client) separately.
- If WHMCS generated the password, it will appear in plaintext in the email.
WordPress in the Admin Area
WHMCS admins can view a client’s WordPress installations in the client’s profile’s Products/Services tab:
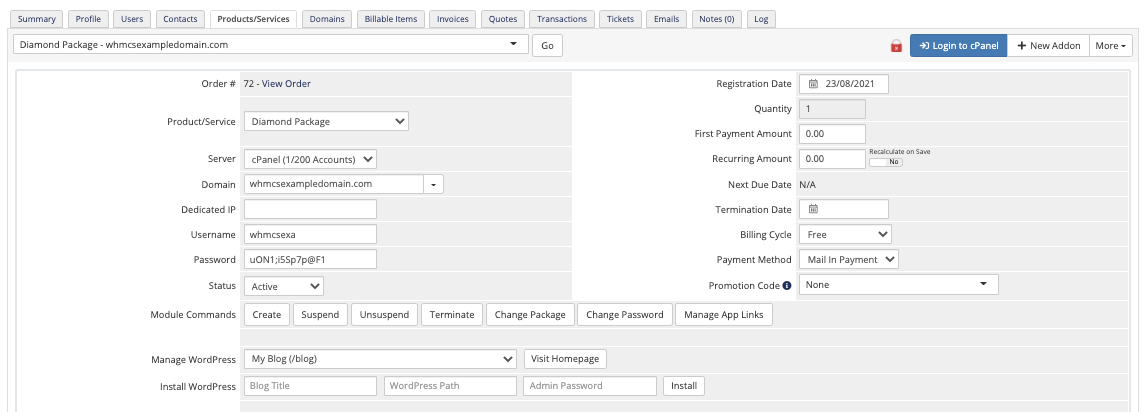
To manage an existing WordPress installation, select the desired WordPress installation from the menu and click Visit Homepage. A new tab will open and display the WordPress installation’s main page.
To install a new WordPress installation, you can optionally choose to enter a blog title, path, and password. Then, click Install.
WordPress in the Client Area
After purchase and provisioning, your customers can go to the product details page in the WHMCS Client Area to access WP Toolkit:
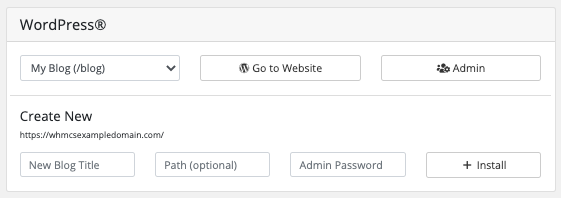
WHMCS’s WP Toolkit implementation does not allow clients to access their WordPress installations directly. To do this, we recommend accessing installations via WP Toolkit in the control panel.
To manage WordPress installations, users can select an existing installation from the menu.
- Clicking Go to Website directs the user to the WordPress installation’s main page.
- Clicking Admin directs the user to the WordPress installation’s login page.
If you selected Allow Client Installation while configuring the product, clients can also add WordPress installations by entering a title, path, and password, and then clicking Install.
Event Handling
The Event Handling setting in the Other tab at Configuration () > System Settings > General Settings determines how events like WordPress installation run during provisioning.
Themes and Plugins
You cannot automatically install plugins or themes using this feature. Clients can install and manage plugins and themes after installation via the WP Toolkit page within the control panel.
Last modified: 2026 April 30