Google Analytics
- The module supports Google Analytics, Universal Analytics, and Google Analytics 4.
- Google discontinued support for Universal Analytics on 2023-07-01 and all Universal Analytics functionality stopped on 2024-07-01. To continue using this addon module, migrate to Google Analytics 4.
Google Analytics™ allows you to track how people find your site, how they navigate through it and how they become customers. You can see trends for metrics like page views, visits, bounce rate, conversion rate, and visitor geographical locations. The Google Analytics addon module automates your Google Analytics integration.
Activation
You must start by activating e-commerce reporting for your website’s profile in Google Analytics. Because this addon module ships with WHMCS by default, you can then immediately activate it in the Admin Area.
To do this:
- Sign in to your Google Analytics account.
- Perform the necessary steps to enable e-commerce for your website.
- In WHMCS, go to Configuration () > System Settings > Addon Modules.
- Click Activate for Google Analytics.
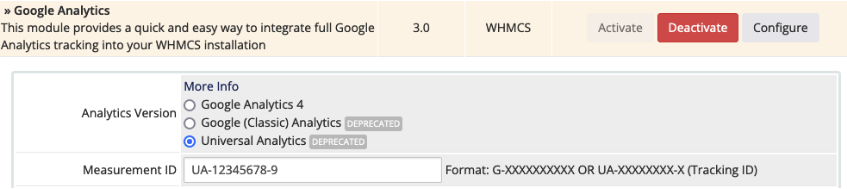
- Click Configure.
- Choose your Google Analytics version.
- Enter your Measurement ID (for Google Analytics 4) or Tracking ID (for other versions). You can find this in your Google Analytics account.
- Optionally, enter your tracking domain. We recommend entering this if you use multiple subdomains for your website.
- Select the admin role groups that will have access to this addon module.
- Click Save Changes.
- If you are using a custom template set, ensure that your
footer.tplfile contains the{$footeroutput}template tag immediately before the closing</body>tag. This ensures that the system returns the tracking code correctly.
Goal Tracking
This addon module supports Google Analytics goal tracking. You can set specific pages that indicate that a user has reached the ultimate intended destination. Usually, this is completing an order by placing it and paying.
In WHMCS, the goal URL for a completed and paid order is /whmcspath/cart.php?a=complete, where /whmcspath/ is the path to the WHMCS installation on your server. This is the page that a user sees after completing checkout and paying using any of the online real-time gateways.
Success Conditions
The goal tracking code renders on the Order Complete page in the ordering process.
The system will direct clients to the page and render the goal tracking code when the payment process meets all of the following conditions:
- The client successfully completes payment.
- Your payment gateway has notified WHMCS of the payment.
- WHMCS marks the invoice paid.
If the payment process has not met these conditions, the system will direct the client to the unpaid invoice. This may occur if the payment gateway must perform additional checks before approving payment or is experiencing delays due to a technical issue.
When this occurs, the system will display the following message:
Thank you for completing the payment process. We are awaiting notification to confirm the payment you just made. We will send you an email confirmation as soon as this has been received.
invoicePaymentSuccessAwaitingNotify language string in the module.Migrating to Google Analytics 4
If you’re using Google Analytics to track visitors and conversions on WHMCS, you must move to Google Analytics 4 in the Google Analytics addon module.
To move to Google Analytics 4:
- Log in to the WHMCS Admin Area.
- Go to Configuration () > System Settings > Addon Modules.
- Click Configure for Google Analytics:
- Select Google Analytics 4 for Analytics Version.
- Enter your Google Analytics 4 Measurement ID (in the format
G-XXXXXXXXXX) for Measurement ID.- You can find this in your <a href=“http://analytics.google.com” targe"_blank">Google Analytics account.
- This will replace the previous Universal Analytics Tracking ID (in the format
UA-XXXXXXXX-X).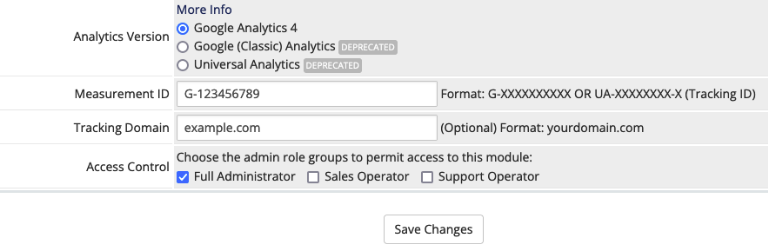
- Click Save Changes.
Troubleshooting
Last modified: 2025 November 27