Project Management
The Project Management addon helps you organize tasks by linking support tickets and invoices with to-do items to create projects. You can work with these in a single interface and track internal discussions, share files, and track or bill for time on individual tasks.
You can access the addon module at Addons > Project Management.
- WHMCS includes this addon module by default.
- For more information about using this addon module, see the WHMCS Project Management website.
- This addon module includes API functions for use on remote systems. For more information, see our API documentation.
Activation
Because this addon module ships with WHMCS by default, you do not need to download files before you activate the addon module through the Admin Area.
To do this:
- If you do not already have a license for this addon module, purchase one from the WHMCS Project Management website.WHMCS Cloud’s Expansion plan includes this addon module, and you can choose this addon module as a premium option for WHMCS Cloud’s Growth plan.
- Go to Configuration () > System Settings > Addon Modules.
- Click Activate for Project Management.
- Click Configure.
- Select the admin role groups that will have access to this addon module.
- Select the admins who can configure Project Management settings within the addon module.
- Click Save Changes.
Using the Addon Module
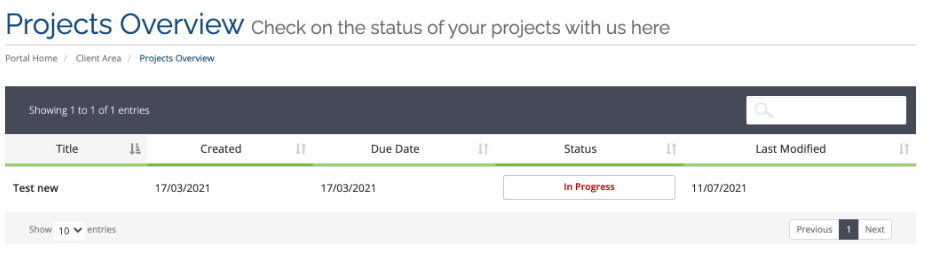
The Project Management Overview lists all of your projects in ascending order, by due date. The list includes the title, assigned staff member, status, creation date, due date, number of days left or overdue, and the last updated date for the project.
You can also review the 10 most recent activity log entries and search for projects.
Projects Tab
This tab displays a list of projects. You can search by project title or associated ticket numbers. If there is only one match for your entered search term, the system will direct you to the project view for that project.
- When you view a support ticket that is associated with a project, the project’s title, due date, and status will display within the support ticket itself.
- Click View Projects under Other Actions in a client’s profile’s Summary tab to go to the project list at Addons > Project Management. The system will automatically filter the list of projects to display projects for that client.
You can apply several filters to the list:
- Incomplete — View all incomplete projects.
- My Incomplete — View your assigned incomplete projects.
- View All — View all complete and incomplete projects.
- Assigned To Me — View your assigned projects, including completed projects.
- Due Within 7 Days — View all projects that are overdue or are due within one week.
- Closed — View only completed projects.
Tasks Tab
This tab lists tasks for all of your projects.
You can apply several filters to the list:
- Incomplete — View all incomplete tasks.
- My Incomplete — View your assigned incomplete tasks.
- View All — View all complete and incomplete tasks.
- Assigned To Me — View your assigned tasks, including completed projects.
- Due Within 7 Days — View all tasks that are overdue or are due within one week.
- Closed — View only completed projects.
Reports Tab
This tab lists reports on your projects, time, and invoice amounts. You can filter this list by date range and admin.
Settings
You can configure several Project Management settings as well as configuring permissions for related actions. To do this, click Settings in the top-right corner of any Project Management addon module page.
You can configure the following settings in the General tab:
- Default Hourly Rate — Set the standard hourly rate to charge in automatic time-based billing calculations. You can override this rate on a per-case basis when generating invoices for time-based logs.
- Project Statuses — Set the available statuses for projects as a comma-separated list.
- Completed Statuses — Select the statuses to treat as completed (not incomplete or awaiting work). This defaults to Abandoned and Completed.
You can configure the following settings in the Client Area tab:
- Enable/Disable — Check to enable or uncheck to disable Client Area project access.
- Allow Access To — Check the sections of the Client Area in which clients can view the status and details of their projects. To access this, add the following line to your Client Area URL:
/index.php?m=project_management
You can set admin role access by checking and unchecking individual permissions in the Permissions tab.
Projects
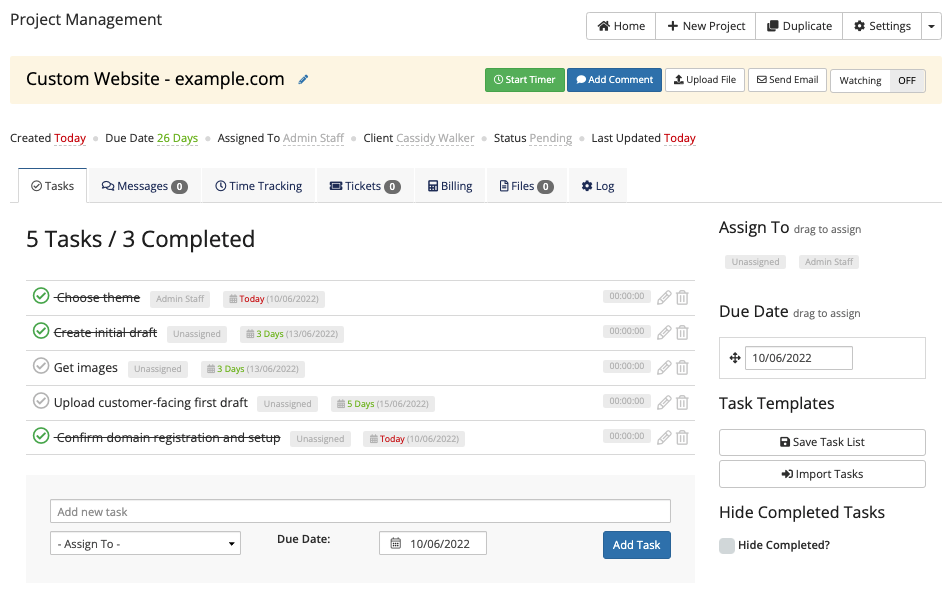
When you access a project, all of the project’s information will display in a single interface page. The top of the page displays basic information about the project, including the creation date, a color-coded due date, the assigned admin, the client, the status, and the date of the last update to the project.
You can perform the following actions while viewing a project:
- Edit (the pencil icon) — Edit the project. You can edit the title, creation and due dates, assigned admin, associated client, and project status. Make the desired changes and then click Save.
- Start Timer — Start tracking time while you work on a project.For more information, see Time Tracking below.
- End Timer — Stop tracking time.
- Add Comment — Add a private staff-only note.
- Upload File — Upload a file to the project.If you need to expand the storage space that is available to WHMCS, we recommend adding external storage locations like an Amazon S3™ bucket. For steps, see Set Up Amazon S3 Storage.
- Send Email — Send an email using a General Messages email template.
- Watching — Enable (On) or disable (Off) email notifications about the project.
Creating a Project
To create a project:
- Click + New Project in the top-right corner.
- Enter the title of the project, associated ticket number, assigned admin, associated client, the creation date, and the due date.
- Click Create.
You can also create a project directly from within a support ticket by clicking the Create New Project tab. This option only appears in tickets if the ticket is not already associated with a project.
Tasks
The Tasks tab displays a list of the project’s tasks.

You can perform the following actions for a project’s tasks:
- Edit (the pencil icon) — Edit the task. Make the desired changes and then click Save.
- Mark complete (the checkmark icon) — Mark the task as complete.
- Delete (the trashcan icon) — Delete the task.
To add a task to a project:
- Enter the task name in Add new task.
- Select an admin to assign to the new task.
- Set the desired due date.
- Click Add Task.
Messages
The Messages tab allows you to add notes and other messages that all admins can see when they view the project. Clients cannot view these messages.
To add a message, enter it in the text box and click Post Reply. You can also browse for and attach files to messages.
Time Tracking
The Time Tracking tab allows you to view time tracking entries. Each entry includes the admin, start time, and end time.
To assign the timer record entry to a specific task:
- Go to the Time Tracking tab for the project.
- Click the pencil icon.
- Select the relevant task from the menu.
- Optionally, adjust the admin, start time, and end time.
- Click Save.
The system then calculates the total time for each task and for the project as a whole.
Tickets
The Tickets tab displays the associated support tickets for a project.
To associate support tickets with a project:
- Go to the Tickets tab in the desired client’s profile.
- Click Associate Ticket.
- Optionally, search for the desired ticket number or keywords from the ticket name.
- Select tickets by checking Select for each desired ticket.
- Click Save.
You can assign a single ticket to multiple projects, and you can assign multiple tickets to a single project. If a project does not have an associated client, assigning a client’s ticket to the project will associate the client with the project.
You can create a new ticket to associate with the project by clicking Open New Ticket.
Billing
The Billing tab lists the associated invoices for the project. The system will automatically associate invoices using the following methods:
- Invoices with a line item that includes Ticket #xxxxxx with any associated ticket number.
- Invoices with a line item that includes Project #xxxxxx with the ID number for the project.
- Invoices that you generated from within the project using the Invoice Selected Items feature.
To remove an invoice from a project, update or remove the line item description to remove the ticket or project reference.
Files
The Files tab allows you to upload files to the project without posting a message.
The system stores all of the attachments that you upload here or in the Messages tab in the attachments directory in a /projects/example/ directory, where example is the Project ID number.
Log
The Log tab lists a full history of each action, the date and time, and the associated admin.
Task Templates
Task Templates are predefined lists of tasks to add to a project.
- You can save and import task templates from within individual projects.
- You can view a list of task templates and delete them by going to Settings > Task Templates in the top-right corner of any Project Management page.
Save a Task List
To save all of the tasks in the current project as a new task template:
- Click Save Task List.
- Enter a name for the new task list.
- Click Save.
You can now replicate this task list in this or other projects.
Import Tasks
To import tasks from an existing task template:
- Click Import Tasks.
- Select the desired task template from the menu or enter text to search for a template and select it.
- Click Import.
This will import a new copy of all of the task template’s tasks into your project.
Homepage Widget
The addon module also includes an Admin Area Dashboard widget, which you can activate for admin role groups at Configuration () > System Settings > Administrator Roles.
The widget allows you to see an overview of projects, including title, due date, days left, status, and recent activity.
Upgrading
To apply a manual update to the Project Management addon module, download the update from our website, unzip the files, and upload them to the root WHMCS directory.
The files are in the appropriate subdirectories to ensure correct upload.
Uninstalling
For steps to uninstall the module and completely remove all associated data (projects, logs, tasks, task templates, and attachments), see Addon Modules.
Troubleshooting
Last modified: 2026 March 4