Quotes
Quotes allow you to send estimates to potential customers to review and if they accept, WHMCS can instantly convert them into invoices for you.
You can access this feature at Billing > Quotes.
Create a Quote
To create a new quote:
- Go to Billing > Quotes and click Create New Quote.
- Enter a subject for the quote. The client can see this.
- Configure the Date Created and Valid Until dates. They will default to the current date and one month in the future, respectively.
- Select whether the quote is for an existing client or a new client.
- For new clients, enter their details in the provided text boxes. The system will only create an account for the client if or when the quote becomes an invoice.
- For each item you wish to add to the quote, set a quantity, description, unit price, and discount percentage under Line Items.
- The system calculates the total by multiplying the Unit Price value by the Qty value and then subtracting the discount.
- To add more lines to the quote, click Save Changes and a new line entry will appear.
- To add a product that you already created at Configuration () > System Settings > Products/Services:
- Click Add a Predefined Product.
- Choose the desired product from the menu.
- Click Select.This will retrieve the product name, group, and price, but it will not link the quote to the product. After the client accepts and pays for the quote, you must add the product to the client’s products and services by clicking Add New Order in the client’s profile’s Summary tab.
- Enter the text that you want to display at the top of the quote in the Proposal Text textbox.
- Enter any desired customer notes and admin-only notes.
- Text that you enter in Customer Notes will display on the quote to the client.
- Text that you enter in Admin Only Notes will never display for the client.
- Click Save Changes.
Quote Actions
After you create a quote, you can perform several actions using the buttons at the bottom of the page. You can view these by either creating a new quote or by clicking the ID number or edit icon.
Duplicate
To create a copy of a quote, click Duplicate. You may want to do this if, for example, you want to retain a record of the previous drafts of the quote rather than altering them directly.
Printable Version
To view a printable version of a quote, click Printable Version.
You can perform several actions with the PDF version of the quote:
- To view the PDF, click View PDF.
- To download the PDF file, click Download PDF.
- To send the PDF file as an email to the client’s specified email address, click Email as PDF.
- You cannot do this until after you have saved the quote.
- The system will change the Stage value to Delivered automatically when you send the email.
Convert to Invoice

After the client accepts the quote, the system automatically marks it as Accepted.
You must then convert the quote into an invoice and, if they do not already exist, create the client.
To do this:
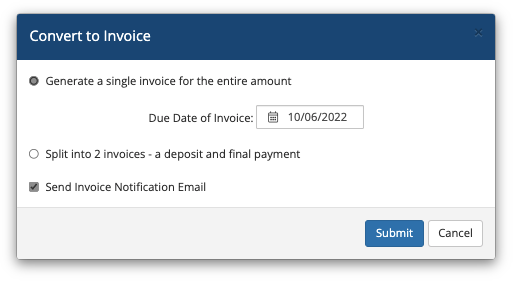
- Scroll down and click Convert to Invoice.
- Select whether to generate one invoice or split the quote into a deposit and down payment.
- To create one invoice, select Generate a single invoice for the entire amount and set a due date.
- To create two invoices, select Split into 2 invoices - a deposit and final downpayment. Then, enter the desired deposit percentage and due dates for each invoice.
- Check Send Invoice Notification Email to send a notification email to the client. If you created two invoices, the system will send a notification email for both of them.
- Click Submit.
Delete
To delete a quote, click Delete.
Closing a Quote
If a customer rejects a quote, you can close it by selecting Lost or Dead for Stage.
In the Client Area
Clients can view all of their quotes at My Quotes in the Client Area. Each quote displays the ID number, subject, creation and expiration dates, and the status.
Last modified: 2025 July 28