Products/Services Tab
From the Products/Services tab, you can easily view details for all of a client’s services, as well as the edit, upgrade or downgrade, move, or delete the product, or run module commands.
You can access this tab when you view a client’s profile at Clients > View/Search Clients.
Viewing a Service
To view and manage a service, select it from the Service menu in the top-left corner of the tab. To view a service addon, select the parent service from the menu.
Service Information
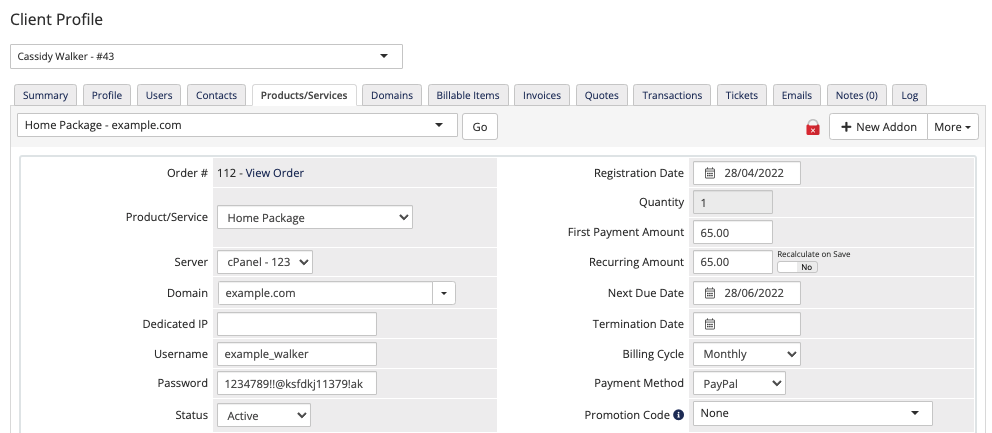
The Products/Services tab lists the following information for each of the client’s services:
| Setting | Description |
|---|---|
| Order # | The order number for the service’s order. Click View Order to view the order. |
| Product/Service | The associated product for this service. To change this, select the desired new product. This list includes all of the available products that you have configured at Configuration () > System Settings > Products/Services. |
| Server | The associated server, if it uses one. |
| Domain | The associated domain name, if the service has one. |
| Dedicated IP | The associated dedicated IP address, if the service uses one. |
| Username | The username for the associated account on the server. |
| Password | The password for the associated account on the server. |
| Status | The service’s current state:
|
| Registration Date | The order date for the service. |
| Quantity | The quantity of this service that the client ordered. |
| First Payment Amount | The sum total due for the initial payment for this service. It includes the service price and any service addons, less any discounts. The system uses this value to generate an invoice when Registration Date is the same as Next Due Date. |
| Recurring Amount | The sum total to invoice for this service on renewal. It includes the service’s price and any service addons, less any discounts. The system uses this value to generate an invoice when Registration Date is not the same as Next Due Date. |
| Auto Recalculate on Save | Check Auto Recalculate on Save to cause WHMCS to recalculate the Recurring Amount using your new settings. Use this, for example, after you change the registration period or promotion code for a domain. If you don’t use Auto Recalculate on Save when you make certain changes, WHMCS will not overwrite the previous settings and calculations for the domain. |
| Next Due Date | The date on which payment for the next renewal invoice is due.
|
| Termination Date | The date on which to terminate the service. |
| Billing Cycle | The frequency with which WHMCS invoices the service.
|
| Payment Method | The payment method to use for invoices for this service. This lets accounts use a different payment method for each of their registered domains. If you configure it in the Invoice tab at Configuration () > System Settings > General Settings, the client may ultimately pay using a different payment method from the one specified here. |
| Promotion Code | To apply a promotional discount to this domain, select the discount from Promotion Code. Changing the value will not automatically change the invoiced price. To change the price on the invoice, check Auto Recalculate on Save before clicking Save Changes. |
SSL Monitoring
The padlock icon in the top-right corner of the tab reflects the SSL status for the domain, if the displayed service uses one.
Service Actions
You can perform the following actions for a service:
Add a Product Addon to a Service
To add a new product addon to a client’s existing service:
- Click New Addon in the top-right corner.
- Ensure that the parent service and Registration Date value are correct.
- Select the desired product addon.
- For predefined addons, choose that addon from Predefined Addon. Leave the name, price, and billing cycle fields empty. WHMCS will set them automatically.
- For custom addons, leave Predefined Addon as None and enter Custom Name, Setup Fee, Recurring, and Billing Cycle values.
- If you don’t want to invoice for the new addon immediately, uncheck Generate Invoice after Adding.
- Click Save Changes.
View Invoices
To view invoices for the currently-selected service, click More in the top-right corner and choose View Invoices.
Upgrades and Downgrades
To upgrade or downgrade a service:
- Click More in the top-right corner.
- Choose Upgrade/Downgrade.
- Select an upgrade type, the new product, and a billing cycle. A preview of the charge for the remainder of the current cycle will appear.
- Optionally, enter any promotion codes.
- Click Create Order.
No immediate changes to the product will occur after creating an upgrade order. The changes to the service and price occur when the new invoice’s status changes to Paid.
Manual Upgrades
To upgrade a service manually, without placing an upgrade order:
- Select a new product for Product/Service.
- Check Auto Recalculate on Save.
- Click Save Changes.
- Click Change Package in the Module Commands section.
Transfer Ownership
To transfer a service to another client:
- Click More.
- Choose Transfer Ownership.
- In the new window that displays, enter the desired Client ID for the new owner or search for and select them.
- Click Transfer.
The system will not transfer the service’s invoices to the new client and those invoices will remain with the previous owner. To invoice the new owner for the service, move the Next Due Date value forward or backward by one day. The system will generate a new invoice when the system cron job runs.
Send Message
To send a message to the account:
- Click More.
- Choose Send Message.
- Select an email template from Choose Message.
- Click Send Message.
Resend Welcome Email
To resend the welcome email for the service:
- Click More.
- Choose Resend Welcome Email.
Delete
To delete a service:
- Click More.
- Choose Delete.
- Click Yes to confirm.
Module Commands
If the service has an associated server or provisioning module, you can run module-specific commands in the Module Commands section.

The available commands vary by module, but most modules include the following commands:
- Create — Creates the associated account and sets the service status to Active.
- Suspend — Suspends the associated account and sets the service status to Suspended. You can enter a suspension reason or leave it blank if the client has an unpaid invoice and you want to automatically unsuspend them after payment.
- Unsuspend — Unsuspends the associated account and sets the service status back to Active.
- Terminate — Terminates the associated account and sets the service status to Terminated. If you want to cancel a product or service that’s associated with a module, click Terminate. After you do this, the system will not generate further invoices.
- Change Package — Runs the upgrade or downgrade routine for the selected product.
- Change Password — Runs the password modification routine for the last saved password value.
Metric Statistics
If the service uses a module that supports usage billing, this section will display a list of the service’s usage for each metric.
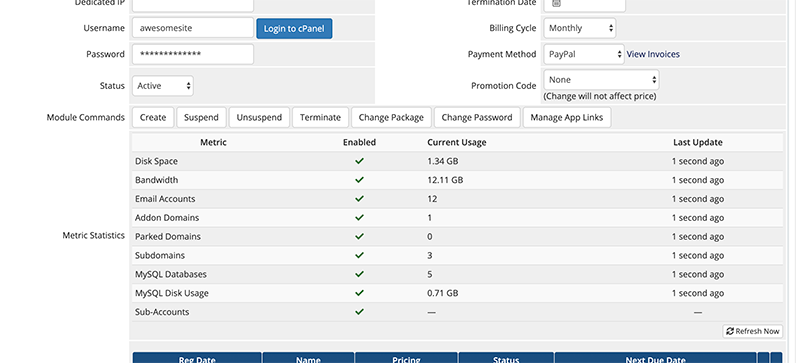
- Usage data displays for each metric regardless of the metric state.
- The Enabled column indicates whether metric billing is enabled in the product configuration.
- The Unbilled Usage tooltip displays usage that the system has not yet included in a renewal invoice (for example, for services with longer billing periods).
You can manually poll for the latest values at any time by clicking Refresh Now.
WordPress Hosting
If you selected Allow Client Installation or Install Automatically while configuring the product, you can manage the product’s WordPress® installations from the client profile.
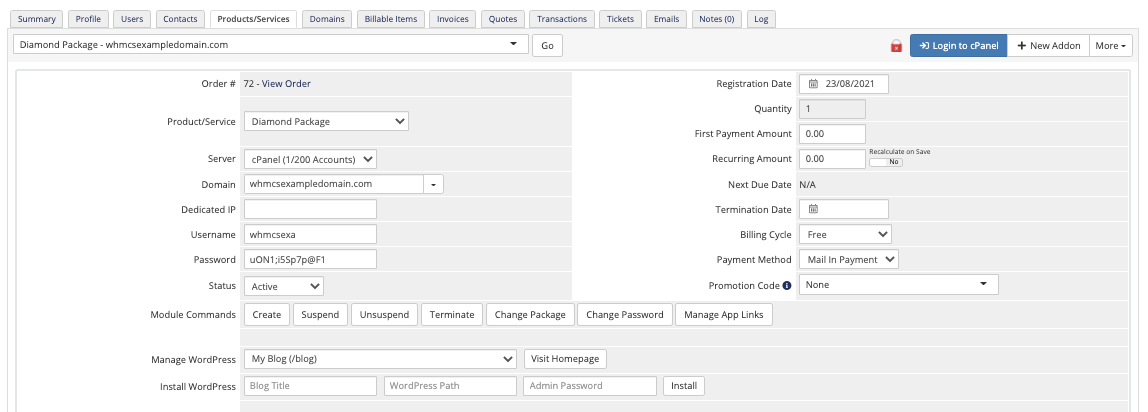
To manage an existing WordPress installation, select the desired WordPress installation from Manage WordPress and click Visit Homepage. A new tab will open and display the WordPress installation’s main page.
To install a new WordPress installation, enter a blog title, path, and password. Then, click Install.
Domain Control Validation
For SSL certificates, click Domain Control Validation view and copy additional information about the certificate’s Domain Control Validation (DCV) method.
Depending on the DCV method that the certificate uses, this can show the client’s email address (email), the host and value (DNS), or the file and value (HTTP file). You can change your DCV method manually by clicking Manually Configure Certificate and selecting a new method in the Validation step.
Addons
Product addons allow you to bill for additional items related to the main product on independant billing cycles from the product. You can configure addons at Configuration () > System Settings > Product Addons.
You can also create custom addons that aren’t predefined. Users can order predefined addons from the client area product details page.
Mananging Addons
Existing addons display with edit and delete icons for managing them.
To edit an addon, click the edit icon for that addon in the Addons list.
Subscription ID
Certain third-party payment gateways (some PayPal® payment gateways and 2Checkout) use this field to store the ID number of their recurring subscriptions. It means that when a payment is made by the subscription it can be associated with this service in WHMCS.
Override Auto-Suspend
Check this to allow extra time for payment to be made by specific individuals. Then, enter a date. The system will wait until that date to suspend the account if it is still unpaid.
- Entering
00/00/0000as the date will permanently prevent the product from being suspended. - Enabling this will also temporarily prevent automatic terminations for nonpayment.
Auto-Terminate End of Cycle
Check this to automatically terminate the product at the end of the billing cycle. Optionally, enter a reason for the termination in Reason.
- When you check this, unpaid invoices for the product will be cancelled and further invoices will not be generated.
- You must also enable Cancellation Requests in Configuration () > System Settings > Automation Settings to use this feature.
Admin Notes
Use this area to enter private notes about the client. Other staff can view these notes when viewing the product or service. Notes entered here are separate from those entered elsewhere in WHMCS.
Last modified: 2026 April 30