Custom Fields
Custom fields allow you to collect and store additional information about clients, products, and support departments. You can set them as either admin-only for private use or allow clients to view them and provide information.
For example, you could create custom questions like how a client found your site, whether they want to join the mailing list, or their VAT or tax number.
You can access this feature at Configuration () > System Settings > Custom Fields.
Custom Field Types
You can create custom fields for clients, products, and support departments.
- Client custom fields display in the client profile for admins, clients, or both. You can use them to request customized contact information, marketing data, or comments.
- Product custom fields display as part of product configuration. You can choose to display them when the client purchases a product, or you can choose to display them in the Admin Area only.Some modules require specific fields. For more information, consult your module’s documentation or, if you are creating your own provisioning module, see Service Properties.
- Support department custom fields display during ticket submission, or you can choose to only display them with tickets in the Admin Area. They allow you to ask users for additional information like current usernames and passwords.
Add a Custom Field
To add a custom field:
- Go to the correct location for the type of custom field that you want to create:
- For Client custom fields, go to Configuration () > System Settings > Custom Fields.
- For Product custom fields, go to the Custom Fields tab for the desired product at Configuration () > System Settings > Products/Services.
- For Support custom fields, go to the Custom Fields tab for the desired support department at Configuration () > System Settings > Support Departments.
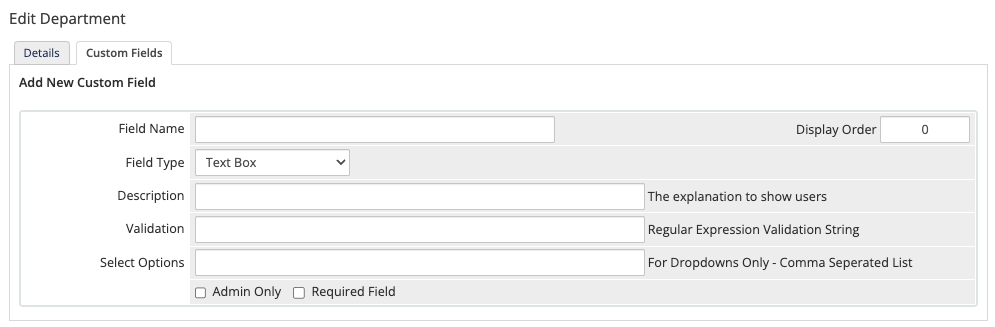
- Under Add New Custom Field, enter the desired field name.You can also include a separate display name. For more information, see Display Names below.
- Select a field type. You can choose the following options:
- Text Box — A single-line text box, for text-only entries.
- Link/URL — A URL. The system automatically adds
http://to the entered value. - Password — A password field. The system will automatically encrypt this value.
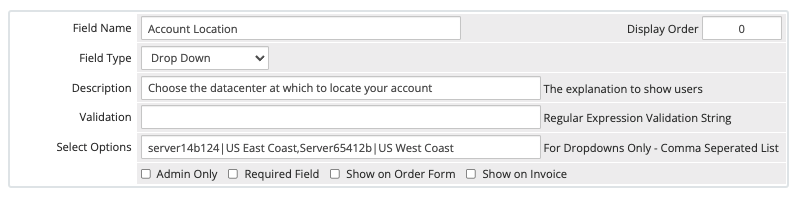
- Drop Down — A menu of options. You can provide a comma-separated list of options in Select Options, below.
- Checkbox — A checkbox for yes-or-no answers.
- Text Area — A text box with multiple lines, for longer text-only entries.
- Enter a description to display with the field.
- Enter a regular expression to use to validate the entered data.For more information, see Validation below.
- If you selected Drop Down for Field Type, enter the options to display in the menu as a comma-separated list. For example, if your field asks how a visitor found your site, you could enter
Facebook,Google,Friend,Otheras options. - Select or deselect the following options:
- Admin Only — Check to hide this field in the Client Area. If you check this, the data will only display in the Admin Area and only admins can enter or update values.
- Required Field — Check to require a response.
- Show on Order Form — Check to display this field on the Client Area order form during client registration.
- If you enable this:
- For Client and Support custom fields, users can view and edit values in the Client Area.
- For Product custom fields, users can provide values when they place an order and view (but not edit) field values in the Client Area after order submission.
- If you do not enable this, the custom field will only appear in the Admin Area for private use.
- If you enable this:
- Show on Invoice — Check to display this field on client invoices. For example, you may want to use this to display tax IDs or VAT numbers on invoices.
- Client custom fields will display under the name and address information on the invoice.
- Product custom fields display as part of the line item descriptions for those products.
- Click Save Changes.
Display Names
Sometimes, a module may require that you format a custom field value in a way that is difficult for users to understand. You can provide a human-readable display name that WHMCS will display to visitors on the order form, emails, and invoices, while still sending the required name to the module.
To do this, use the following format when entering a name in Field Name:
required value|display value
For example:
Disk Space|Your Web Quota
10000MB|10 Gigabytes
rbx01ssd|French Server - Solid State Drive
Validation
The regular expression validation rules allow you to define what value the field can accept. The system won’t allow the user to proceed until it passes the validation rule.
\).For example:
| Validation Rule | Description |
|---|---|
/^([a-zA-Z0-9_-])+(\.[a-zA-Z0-9_-]+)*\.([a-zA-Z]{2,6})$/ | A domain name with the format google.com. |
/^[a-z\d_]{4,28}$/i | A username that contains between four and 28 characters, using only alphanumeric characters and underscores. |
/^(\(?[0-9]{3,3}\)?|[0-9]{3,3}[-. ]?)[ ][0-9]{3,3}[-. ]?[0-9]{4,4}$/ | A telephone number in the following format: (###) ###-#### |
/^\d{1,2}\/\d{1,2}\/\d{4}$/ | A date in the following format: DD/MM/YYYY |
/^[0-9]+$/ | Any number of numerals (0-9). |
Searching
You can search for the values from custom client fields at Clients > View/Search Clients in the Search/Filter tab.
You can search for values from custom product fields at Clients > Products/Services in the Search/Filter tab for the desired product group.
on in the Custom Field Value field. This will display results that include the checked option.Displaying Custom Fields
You can display data from custom fields in merge fields throughout WHMCS.
Display Custom Fields in Emails
Display Custom Fields on Pages
To display custom fields on service-related pages, the merge fields use the following format, where fieldname is the name of the custom field, lowercase with no spaces:
{$client_custom_field_fieldnamehere}
For example, for IP address, the merge field would be:
{$service_custom_field_ipaddress}
For fields with display names, use the display name to reference the field:
| Name | Reference this Field As |
|---|---|
CustomerType (no display name) | {$client_custom_field_customertype} |
CustomerType|Type of Customer (display name) | {$client_custom_field_typeofcustomer} |
Display Multi-Line Text Areas
Custom fields that use the Text Area field type can accept multiple lines of input. However, by default, the system displays this data in merge fields on a single line.
To see this data in the entered multi-line format, use the following merge field format, where fieldnamehere is the field name:
{$client_custom_field_fieldnamehere|nl2br}
For example:
{$service_custom_field_ipallocation|nl2br}
Last modified: 2025 July 28