Order Management
Every time that a customer buys something from you, the system creates an order. The order record contains all of the details from the checkout process for that purchase, including a unique reference number (the order ID), promotion codes, affiliates, and fraud check results (if you have enabled them).
You can access all of the orders in WHMCS at Orders > List All Orders.
Order Creation
Every time that a customer buys something from you, the system creates an order.
Renewal Orders
The system does not create order records for automatic renewals that do not involve a new checkout process and are recurring invoices from a previous order.
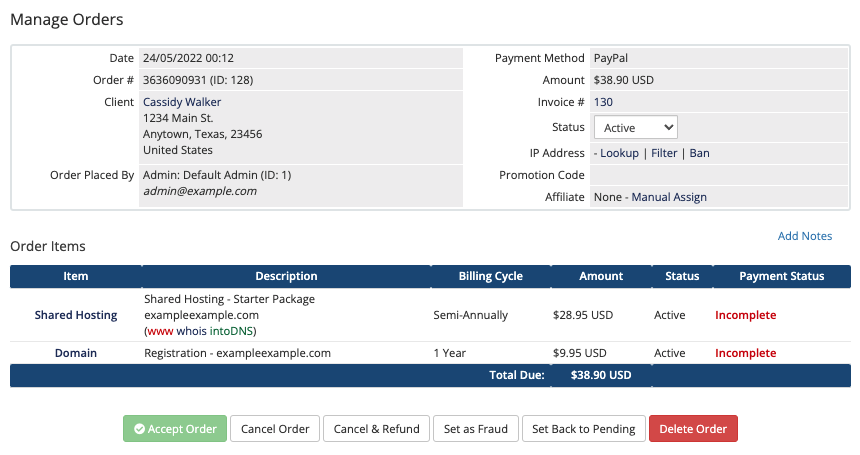
Managing Orders
To manage an individual order, click on it in the list at Orders > List All Orders.
- You can find a list of orders for a client by clicking View Orders in the client profile’s Summary tab.
- You can also access orders by clicking the order number while viewing a service in the client profile’s Products/Services tab or a domain in the client profile’s Domains tab.
You can perform bulk actions on multiple orders by selecting the desired orders and clicking an action at the bottom of the list. This allows you to accept multiple orders (Accept Order), cancel multiple orders (Cancel Order), delete multiple orders (Delete Order), or compose an email message to the associated clients for the orders (Send Message).
Order Details
All orders include the following order information:
| Order Detail | Description |
|---|---|
| Date | The order date. |
| Order # | The order number and ID number.
|
| Client | The associated client and their mailing address. You can set this address in the client’s profile’s Summary tab. |
| Order Placed By | The user or admin who placed the order in the system. This also lists their ID number and email address. |
| Payment Method | The payment method that the orderer used at checkout. |
| Amount | The amount that the system charged the customer for the order. |
| Invoice # | The ID number for the associated invoice for the order, if the system has generated one. Click the invoice ID to view the invoice. |
| Status | The order status. By default, the system creates orders in the Pending status. Even if you have enabled automatic activation and provisioning for services, the order itself will remain in the Pending status until you manually accept or deny it. This ensures that you can always see and review new orders to check for fraud or other problems. You can view a list of orders in the Pending status by going to Orders » List Pending Orders. |
| IP Address | The IP address of the user or admin who placed the order. |
| Promotion Code | Any promotion codes or discounts that the order uses. |
| Affiliate | The affiliate who received credit for this order. Click Manual Assign to assign an affiliate to the order. |
Order Items
Under the order details, you can find a list of the products, addons, and domains in the order, with statuses and payment information.
- If you have enabled Fraud Protection, the list will display fraud check results.
- If you have enabled it at Configuration () > System Settings > General Settings, the system displays any notes that the client provided for the order.
Fraud Check Results
If you have enabled fraud checks at Configuration () > System Settings > Fraud Protection, your FraudLabs Pro or MaxMind results will display in the Order Items list.
If an order’s fraud score is over your setting’s threshold, the system automatically sets the order status to Fraud.
If you determine that an order is not fraudulent after fraud checks indicated fraud, you can click Set Back to Pending to override the fraud check.
- This changes the status from Fraud to Pending and sets the related invoice to Unpaid.
- The client can then pay normally through the Client Area, or you can go to the invoice to instantly attempt payment capture through the selected payment gateway.
Products
If the order contains any services that the system has not activated and provisioned yet, you will see options to select a server to provision the account to or define a username and password. You will also see options to create the account and send a welcome email.
Check Run Module Create to run the associated module Create command when you click Accept Order (see below).
Domains
If the order contains any domain registrations that the system has not activated and registered yet, you will see options to select a domain registrar and choose whether to submit the registration. Use these options if you have not enabled automatic domain registration or you want to register or transfer the domain before payment.
Actions
You can perform the following actions at the bottom of the order:
- Accept Order — Set the order status from Pending to Active. If you selected Run Module Create, the system will also run the associated Create module command for all of the order’s services to provision them.
- Cancel Order — Set the order status to Cancelled, run the Terminate module command for any active services in the order, and set the status of any unpaid invoice for the order to Cancelled.
- Cancel & Refund — Set the order status to Cancelled, run the Terminate module command for any active services in the order, and refund any payments on invoices for the order using the applicable payment gateway (if the payment gateway module supports it).
- Set as Fraud — Set the order status to Fraud, run the Terminate module command for any active services in the order, and cancel the associated invoice.
- Set Back to Pending — Set the order status and all associated service statuses to Pending.
- Delete Order — Delete the order and everything in the system that relates to it.Only use this option if you want to irrevocably remove the order from the system. This includes deleting the services in the order and the associated invoice.
Last modified: 2025 July 28