Create an Order
When your customers purchase items from you, they place orders through your online store and the Client Area. You can create orders for customers in the Admin Area at Orders > Add New Order.
Orders contain all of the details from the checkout process, including a unique reference number, any promo codes that the client used, the affiliate who referred them, and fraud check results (if you have enabled them).
Create an Order
To create an order:
1. Add a new order.
Go to Orders > Add New Order.
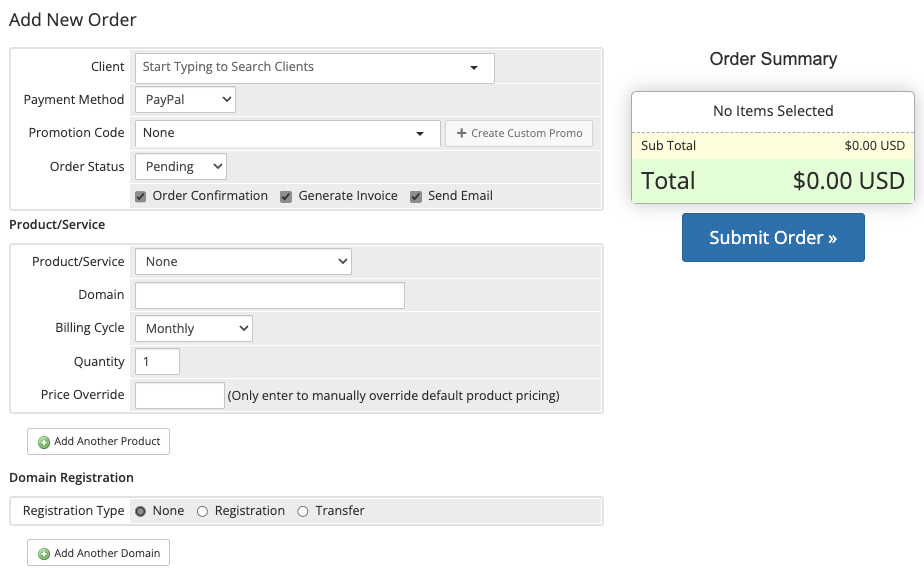
2. Select a client.
Select the desired client.
3. Select a payment method.
Select a payment method.
4. Add promotions.
To add a promotion code to the order, select one or click Create Custom Promo.
5. Select an order status.
To alter the order status, select a status. The system selects the Pending status by default.
6. Select order options.
Select the desired options:
- Select Order Confirmation to send the Order Confirmation email template to the client when you create the order.
- Select Generate Invoice to create an invoice for the order.
- If you selected Generate Invoice, select Send Email to send that invoice to the client.
7. Enter product details.
Enter and select the details for the desired product, including a domain name, billing cycle, quantity, and any pricing overrides.
- If you do not change Billing Cycle and Price Override, the system will use the pricing from the shortest configured billing cycle.
- Use Quantity to order multiples of a single product that doesn’t require any specific configuration on the initial order (such as a domain name and configurable options). For example, if you are selling a software license using the Software Licensing addon and the customer wishes to receive 10 licenses, you could enter
10for Quantity. The system would then create 10 services on their account after order submission.
8. Select and enter domain details.
Optionally, select and enter the appropriate details to add one or more domain names to the order.
- Select None if this order doesn’t require a domain.
- For registration, the system will prompt you for the domain name, the number of years to register it for, any applicable addons, and any pricing overrides for the registration and future renewal amounts. If there isn’t a price override, the system uses the regular price for that TLD.
- For transfers, the system will prompt you for the same details, along with the EPP code (or Transfer Authorization code) from the existing registrar for the domain. During the Client Area ordering process, the client supplies this, and you may need to obtain it from them first if it applies to the domain that you are trying to transfer.
- For Domain Only orders, only set Domain Registration. Do not enter anything for Product/Service, Domain, Billing Cycle, Quantity, and Price Override.
9. Repeat steps 7 and 8 for each additional product.
To include multiple products in the order, click Add Another Product. Repeat steps 7 and 8 for each additional product.
10. Submit the order.
Click Submit Order.
Last modified: 2026 April 30