Products
Configuring products and services in WHMCS allows you to determine the specifics for each of your offerings.
You can access this feature at Configuration () > System Settings > Products/Services.
Products
To create a new product, click Create a New Product at Configuration () > System Settings > Products/Services and configure the settings below.
- For steps to create a product, see Create a Product.
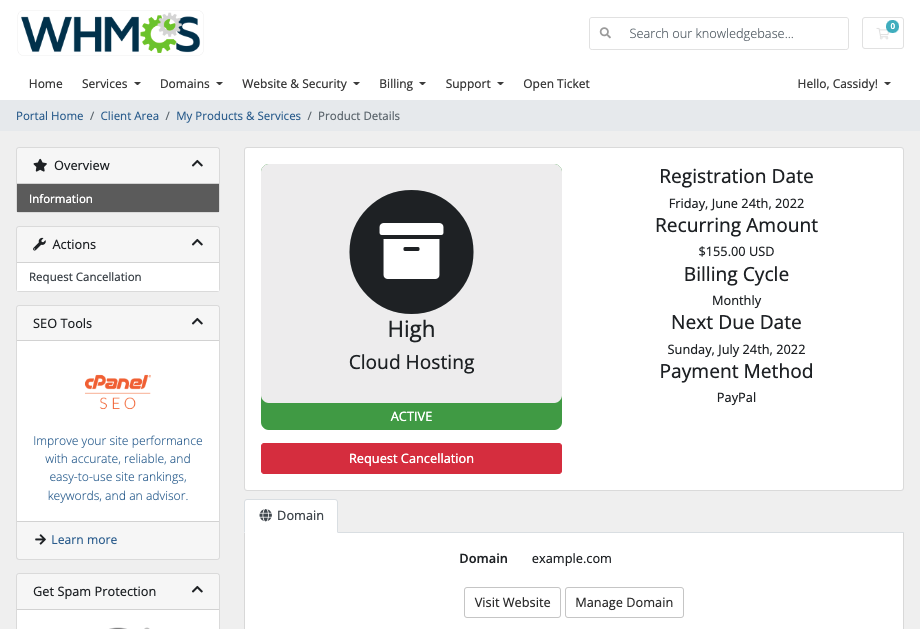
- When a client orders a product from you, the system adds their copy of that product (a service) to their account. You can manage services in the Products/Services tab in the client’s profile.
After creating a product, you can edit it by clicking the edit icon for the product in the product list.
Details
The Details tab contains general information about a product, including its name and product group:
| Setting | Description |
|---|---|
| Product Type | Select a product type:
|
| Product Group | Select a product group. Before you create products, you must create at least one product group to assign them to. |
| Product Name | Enter a product name. |
| Product Tagline | Enter a product tagline. This displays when this product displays as a recommendation. |
| URL | Enter the desired product URL in the URL text box or use the default generated product URL. For more information, see Friendly URLs. |
| Product Short Description | Enter brief information that relates to this product on the order form. This displays when this product displays as a recommendation. |
| Product Description | Enter detailed information that relates to this product on the order form. If you use the key: value format, the system will apply the Feature Highlights styling.When using HTML, we recommend avoiding new lines unless you want them to appear in the end result. The system maintains line breaks when you format a description. |
| Product Color | Select the product’s main color when it displays as a product recommendation.
|
| Welcome Email | Select the email template to send when activating the product. You can also create custom email templates to use on different products. |
| Require Domain | Check to display domain registration option when ordering the product. Always enable this for hosting products and disable it for other products that don’t require a domain name. |
| Stock Control | Check to enable a stock control limit and then enter the available quantity of the item (for example, servers or a limited special-offer product). WHMCS will stop orders when the available quantity is 0. |
| Apply Tax | Check to apply tax rules to this product. For more information, see Tax Configuration and Enable Taxes for a Product. |
| Featured | Check to display a product more prominently. This option is only available on some supported order forms. |
| Hidden | Check to show the product on the order form. Customers will still be able to order this using the direct order links. For more information, see Hide or Retire Products. |
| Retired | Check to hide the product from Admin Area menus, like the product menu in the client’s profile. For more information, see Hide or Retire Products. |
Pricing
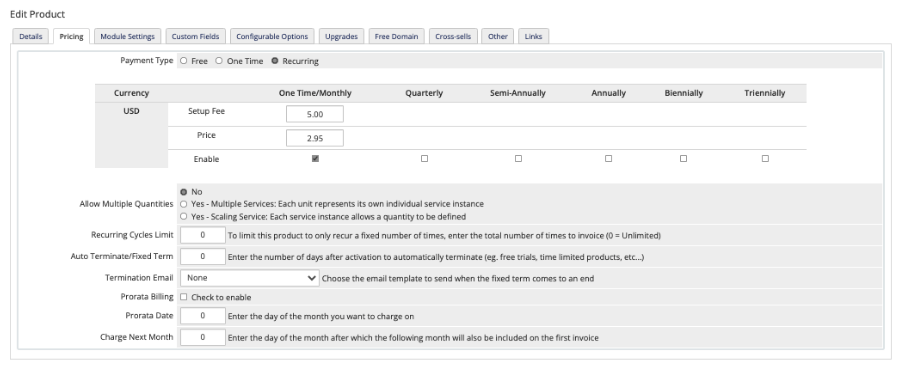
The Pricing tab lets you specify the prices and active duration of the product:
| Setting | Description |
|---|---|
| Payment Types | Select Free, One Time, or Recurring.
When you set Payment Type to Free:
|
| Allow Multiple Quantities | Select whether clients can order multiple instances of this product on the checkout page. If you enable this, the product cannot require additional configuration (like custom fields or configurable options).
|
| Recurring Cycles Limit | For Recurring payment types, the default value (0) will invoice indefinitely until cancellation. However, by entering a value here, you can limit the number of times that the system will invoice clients for the service.
|
| Auto Terminate/Fixed Term | Enter the number of days to wait after the registration date before automatically terminating the service. If you enter a number here, you must also select an email to send when termination occurs for Termination Email below.
For more information, see Promotions. |
| Termination Email | If you entered a value for Auto Terminate/Fixed Term, select an email to send to the client at termination. For more information, see Assign Custom Emails to Products. |
| Prorata Billing |
Jun 15–Jul 15).For more information and example configurations, see Prorata Billing. |
| Prorata Date | The specific prorata billing date for all sales of the product. If you set this to 1, the system will charge all clients on the 1st of each month.For more information and example configurations, see Prorata Billing. |
| Charge Next Month | The date after which the system will also charge clients for the next billing period on their initial invoice. This prevents clients who purchase near the end of a prorata billing period from paying only a small amount for their initial invoice. Enter a day of the month to charge clients after that day of the month, or set one of the following values:
For more information and example configurations, see Prorata Billing. |
| On-Demand Renewals | Configure product-specific settings for on-demand renewals. For more information, see On-Demand Renewals.
|
Module Settings
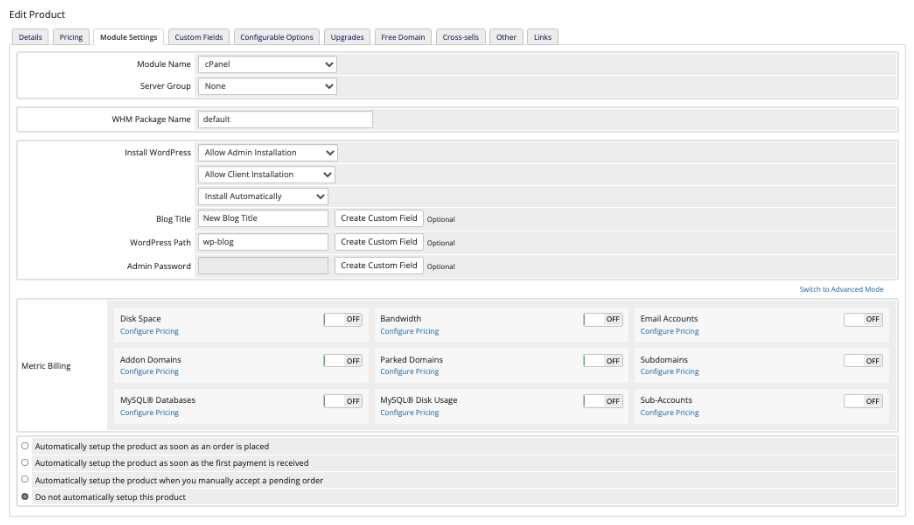
The Module Settings tab lets you specify which server type the product will use and how WHMCS will behave when someone orders this product.
Module
For Module Name, select the type of server you’re using or another provisioning module that you wish to use. The options that you see below this depend on the module that you choose.
Metric Billing
The Metric Billing section displays when you select a module that supports this feature:

If you enable a metric, it will appear in the product details in the Client Area. An admin will always see all metrics, enabled or disabled, within the Admin Area when viewing a service for a product which reports metrics.
To enable a metric:
- Set that toggle to On.
- Click Configure Pricing for that metric. The module predefines the following attributes for each metric:
- Metric Type — Defines how to measure the metric. This can be Snapshot, Daily, or Monthly.
- Metric Unit — Defines the unit of measurement (for example, the number of domains or accounts).
- Select the type of pricing. This will define how the system calculates pricing for the metric. You can select one of the following pricing schemes:
- Per Unit — Charge the same amount for each unit.
- Total Volume — Charge a per-unit price based on the total volume that the client consumes.
- Graduated — Charge a per-unit price based on the consumption range. The total charge is the sum of the range calculations.For Total Volume and Graduated pricing, you must enter pricing in the text boxes.
- For Quantity Included, enter the number of units to include in the product’s base price. The system will not start charging the client until the usage exceeds the quantity that you enter here.
- Click Save.
Automation Settings
At the bottom of the page, the automation settings determine when the system activates the product:
- Automatically setup the product as soon as an order is placed — Set the product up instantly. Generally, use this for free products.
- Automatically setup the product as soon as the first payment is received — Set the product up when the customer pays for the order.
- Automatically setup the product when you manually accept a pending order — Set the product up after an admin has manually reviewed and accepted the order.
- Do not automatically setup this product — Never set the product up automatically. Admins can still initiate setup manually from the product details page under a client’s profile.
Custom Fields
The Custom Fields tab lets you create custom fields for this product. This allows you to collect additional order form information that you need to supply the product.
To add a custom field, enter the desired field information and choose a field type. Then, click Save Changes.
Configurable Options
The Configurable Options tab lets you select the configurable options to associate with the product. You can display them on the order form or in the Client Area. Configurable options alter the price of the product.
Upgrades
The Upgrades tab lets you specify whether the client can upgrade or downgrade from this product to another.
WHMCS can fully automate upgrades and downgrades for many of the modules.
- Select the products that the product can be upgrade or downgrade to.
- Use
Ctrl+Clickto select multiple products. - Check Configurable Options to enable upgrading configurable options, if there are any on the product.
- Select an Upgrade Email template to use when a client upgrades to this product. You will first need to create a new product email template under Configuration () > System Settings > Email Templates.For more information, see Assign Custom Emails to Products.
Free Domain
The Free Domain tab lets you configure the offer of a free domain with a product. WHMCS lets you offer free domains with your packages when customers purchase them with certain payment terms. For example, you might want to offer a free domain when someone purchases a package annually.
- For Free Domain, choose whether and how to offer a free domain.
- Select one or more Free Domain Payment Terms to set the billing cycles to require in order for a product to receive a free domain.
- Select one or more Free Domain TLDs to set which TLDs clients can use for a free domain.
Cross-sells
The Cross-sells tab lets you choose the recommended products that display in the Client Area shopping cart to clients who are purchasing this product.
To add products to the list:
- Use the Start typing to search for products. menu or enter search terms to find the desired products.
- A maximum of 30 items will appear in the product selection menu.
- Using the search feature will allow the system to display products that it did not initially list.
- Select the desired product by clicking on it.
- When you select a product, it will appear in the Product Cross-sells list.
- Click and drag the product to the desired position to reorder the list.
- Click Save Changes.
To remove a product from the list, click the trash icon and then click Save Changes.
Other
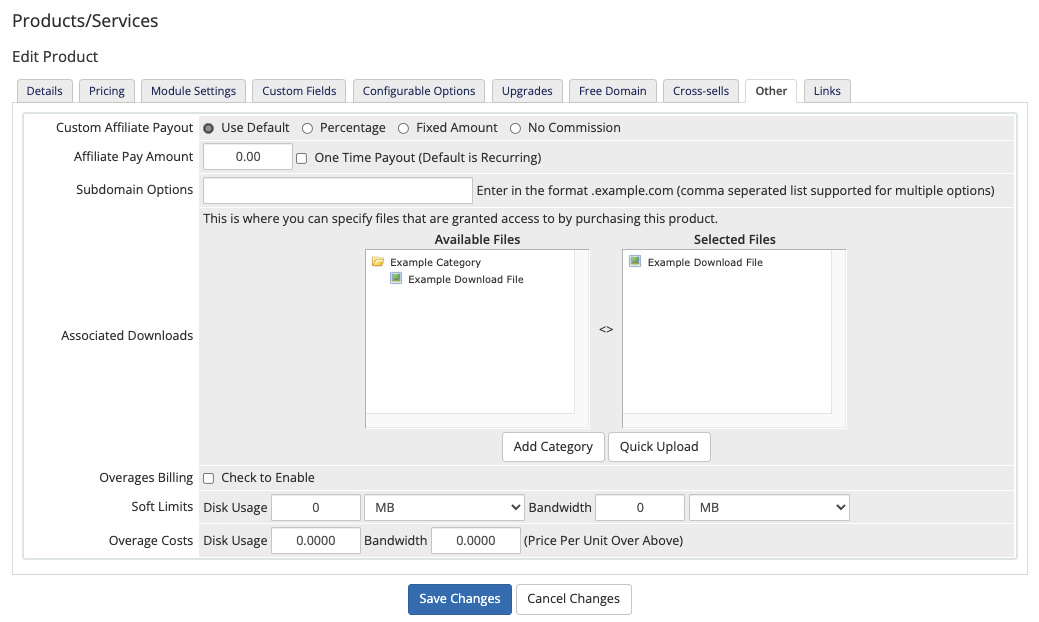
The Other tab lets you set miscellaneous settings like product affiliate rates, product downloads, and overage billing:
| Setting | Description |
|---|---|
| Custom Affiliate Payout | Select whether to provide a percentage of the price, provide a fixed amount per sale, or disable commissions. Selecting No Commission disables commissions for the product. This setting overrides the default commission. However, if you configure either the affiliate or product commission to one-time, that selection will override this setting. |
| Affiliate Pay Amount | The percentage or amount paid for a purchase of this product, depending on your choice for Custom Affiliate Payout. |
| One Time Payout | Whether to prevent subsequent commission payments when the product renews.
|
| Subdomain Options | Enter a domain in the format .example.com to offer a free subdomain for the domain at signup. You can offer more than one by entering a comma-separated list (for example, .example.com,.example.net). |
| Associated Downloads | The files to automatically release to the customer when the product status changes to Active. Click Add Category to create a new category of downloads or click Quick Upload to upload a new file. For more information, see Product Downloads Distribution. If you need to expand the storage space that is available to WHMCS, we recommend adding external storage locations like an Amazon S3™ bucket. For steps, see Set Up Amazon S3 Storage. |
| Overages Billing | Enable billing for the product based on disk and bandwidth usage for the month. For more information, see Overage Billing. |
| Soft Limits | Enter the soft limits for Disk Usage and Bandwidth. |
| Overage Costs | Enter the overage costs for Disk Usage and Bandwidth. |
| On-Demand Renewals | Configure product-specific settings for on-demand renewals. For more information, see On-Demand Renewals.
|
Links
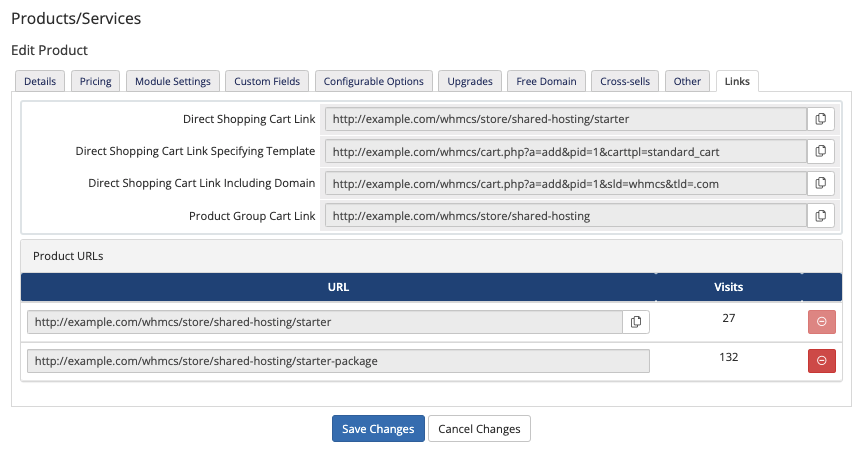
The Links tab lets you view the URLs that direct visitors to a product.
You can copy the following direct links for the product and its associated group:
| URL | Description |
|---|---|
| Direct Shopping Cart Link | Add the product to the shopping cart and direct the visitor to the configuration page. |
| Direct Shopping Cart Link Specifying Template | Add the product to the shopping cart and direct the visitor to the configuration page using the specified order form template. |
| Direct Shopping Cart Link Including Domain | Add the product to the shopping cart and direct the visitor to the domain selection page. |
| Product Group Cart Link | Direct the visitor to the product group page. |
| Product URLs | Direct the visitor to the Direct Shopping Cart Link URL and track the number of visits for that URL. Each time that a visitor clicks on one of these URLs, the Visits count will increase. To delete a Product URL, click the corresponding red delete icon.
|
Product List
The product list includes every product group and product that you have configured in WHMCS. Individual products appear under their product group, and you can use sorting to reorganize how products will display on the order form.
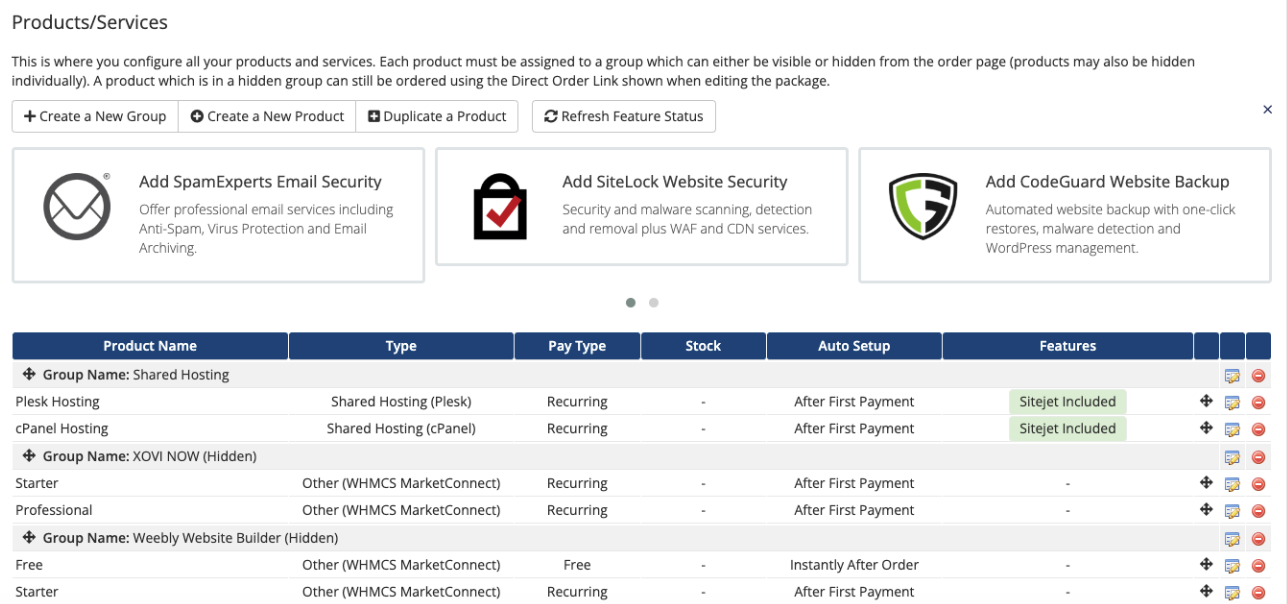
This list includes the following information for each product:
- Product Name — The product’s name.
- Type — The product’s type.
- Pay Type — The Payment Types value that you selected in the Pricing tab.
- Stock — The available quantity for the product, if you enabled Stock Control in the Details tab.
- Auto Setup — Whether you selected an automatic setup option for Automation Settings in the Module Settings tab.
- Features — Specific available features for this product.
- Currently, this column lists whether the product includes Sitejet Builder.
- To refresh the statuses in this column, click Refresh Feature Status at the top of the page.
You can sort products in the list using the crosshair icon to the right of the appropriate row.
Last modified: 2026 January 14