Migrate cPanel Services
After you move client hosting accounts from an old cPanel & WHM server to a new one, you must perform several tasks in WHMCS to complete the migration. To do this, you can choose between several methods:
- Add the new server to WHMCS and then manually change the server for each client service individually.
- Add the new server to WHMCS and then change the server for all client services using a MySQL® query.
- Replace the old server’s details in the server configuration with the new server’s details.
Add the New Server and Change Services Individually
You can choose to add the new server to WHMCS and then manually change the server for each client service individually. Use this method if you are only migrating a small number of services or if you are moving gradually, on a service-by-service basis.
To do this:
- Go to Configuration () > System Settings > Servers.
- Add your new cPanel & WHM server to WHMCS normally.For steps, see Create a cPanel Server.
- For each service that had an associated account on the old cPanel & WHM server:
- Go to the service in the Products/Services tab in the client’s profile.
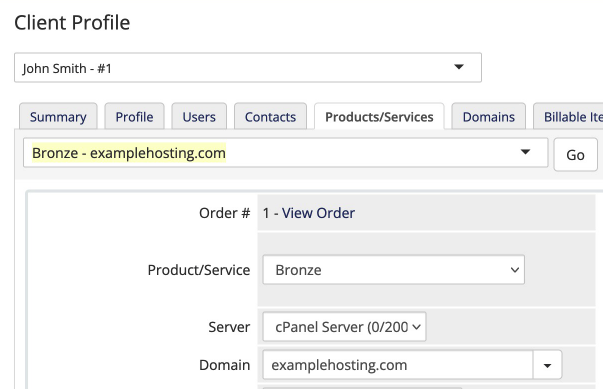
- For Server, select the new cPanel & WHM server.
- Click Save Changes.
- Go to the service in the Products/Services tab in the client’s profile.
Add the New Server and Change Services Using MySQL
If you use a self-hosted WHMCS installation, you can choose to add the new server to WHMCS and then change the server for all client services using a MySQL query. Use this method if you are migrating a larger number of services.
To do this:
Go to Configuration () > System Settings > Servers.
Add your new cPanel & WHM server to WHMCS normally.
For steps, see Create a cPanel Server.Find the ID numbers for the old and new servers in your WHMCS installation. To do this:
Go to Configuration () > System Settings > Servers.
View each server’s information. The ID will appear in the URL in your browser, as in the example below:
https://example.com/whmcs/admin/configservers.php?action=manage&id=1In this example, the server ID is
1.
Run the following MySQL query against your WHMCS database, where
NEW_SERVER_IDis the new server’s ID andOLD_SERVER_IDis the old server’s ID:UPDATE tblhosting SET server = 'NEW_SERVER_ID' WHERE server = 'OLD_SERVER_ID';
Replace the Old Server’s Details
If you do not want to add the new server as a separate server and retain the old server, you can replace the old server’s details in the server configuration with the new server’s details. If you use this method, you do not need to update the associated services because the server ID did not change in WHMCS.
To do this:
- Go to Configuration () > System Settings > Servers.
- Edit the server.
- Replace the old cPanel & WHM server’s hostname with the new cPanel & WHM server’s hostname.
- Enter the new cPanel & WHM server IP address.
- If they differ, update the nameservers.
- Enter the new username and password for WHM.
- Enter the API Token value for the new server.
- Click Save Changes.
Verifying Successful Migration
After you migrate your data, we recommend performing the following steps to check whether data migrated successfully:
- Go to Configuration () > System Settings > Servers.
- Click Sync Accounts for the server.
- WHMCS will make an API call to the remote web server to fetch an up-to-date list of account records.
- This may take a few seconds.
- Examine the analysis summary report that displays and note any discrepancies or issues.Do not click Continue if an account is missing. Instead, review the cPanel migration logs and make sure that it appears on the new server.
Last modified: 2025 November 27