Add a Knowledgebase Article
- Add a Knowledgebase Article
- 1. Go to the Add Article tab.
- 2. Enter an article name.
- 3. Click Add Article.
- 4. Select the article’s category.
- 5. Manually set the article’s views or votes.
- 6. Manually set the article’s display order.
- 7. Set the article’s privacy.
- 8. Set the article’s tags.
- 9. Enter the article’s contents.
- 10. Save the article.
On this page
- Add a Knowledgebase Article
- 1. Go to the Add Article tab.
- 2. Enter an article name.
- 3. Click Add Article.
- 4. Select the article’s category.
- 5. Manually set the article’s views or votes.
- 6. Manually set the article’s display order.
- 7. Set the article’s privacy.
- 8. Set the article’s tags.
- 9. Enter the article’s contents.
- 10. Save the article.
WHMCS includes all of the built-in tools and features that you need to create a knowledgebase of your company’s most important information. In your knowledgebase, each article is an individual page of information that your customers can view.
Add a Knowledgebase Article
To add a new article to your knowledgebase:
1. Go to the Add Article tab.
Go to Support > Knowledgebase and choose the Add Article tab.
2. Enter an article name.
Enter an article name. This is the name that will appear for both customers and admins.
3. Click Add Article.
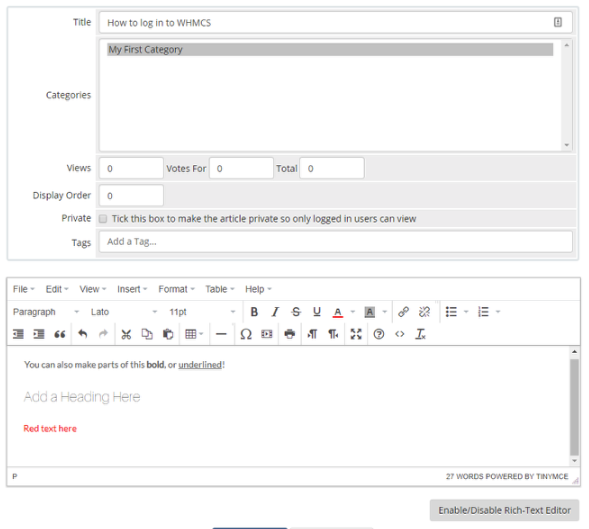
Click Add Article. The article editor will appear.

4. Select the article’s category.
Select the article’s category or categories.
CTRL while clicking on the desired categories.5. Manually set the article’s views or votes.
Optionally, to manually set the views or votes for the article, enter the desired numbers in Views, Votes For, or Total.
6. Manually set the article’s display order.
Optionally, to override the default alphanumeric display order, enter the desired number or letter in Display Order.
For example, entering 0 will cause the article to display at the top of the category.
7. Set the article’s privacy.
Check Private to only allow logged-in users to view the article.
8. Set the article’s tags.
Enter each desired tag and press Enter or Space.
- As you type, matching existing tags will display. Press
Enterto add a displayed tag. - Tags cannot contain spaces.
9. Enter the article’s contents.
Enter the article content and apply your desired formatting.
You can add and edit article contents as HTML or in a rich text editor. To toggle between these views, click Enable/Disable Rich Text Editor.
10. Save the article.
Click Save Changes.
Last modified: 2025 November 27