Application Links
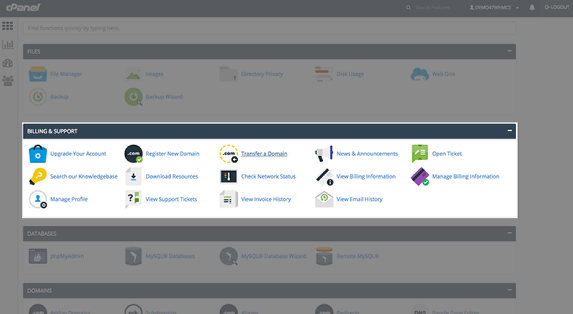
Application Links allow customers to seamlessly transition from cPanel to the WHMCS Client Area using Single Sign-On. When you enable Application Links, those icons will display automatically within the control panel.
You can access this feature at Configuration () > System Settings > Application Links.
Using Application Links
To use Application Links, you must enable the desired applications. Separately, you can enable and configure the individual links for each application.
- Before you can use Application Links, you must first add at least one server that runs a supported version of cPanel & WHM to your WHMCS installation.
- You can choose to configure individual links for an application before you enable Application Links for the application itself, or you can configure them after enabling the application. The system syncs your changes and pushes them out across all of your servers regardless of order.
Activate Applications
To activate Application Links for an application, go to Configuration () > System Settings > Application Links.
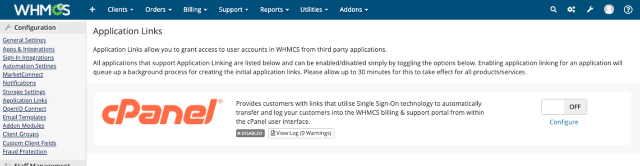
Set the desired application toggle to ON to activate it. The system will sync the change automatically.
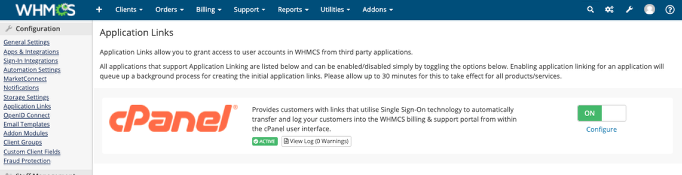
- Syncing this change may require several seconds. The grey DISABLED badge will change to a green ACTIVE badge when the sync is finished.
- If you navigate away from the page while the sync is still in progress, it may not fully sync all links.
Configure Links
To configure the links for an application, click Configure under that application’s toggle.
- Go to Configuration () > System Settings > Application Links.
- Click Configure for the desired application. A list of links and configuration settings will appear.
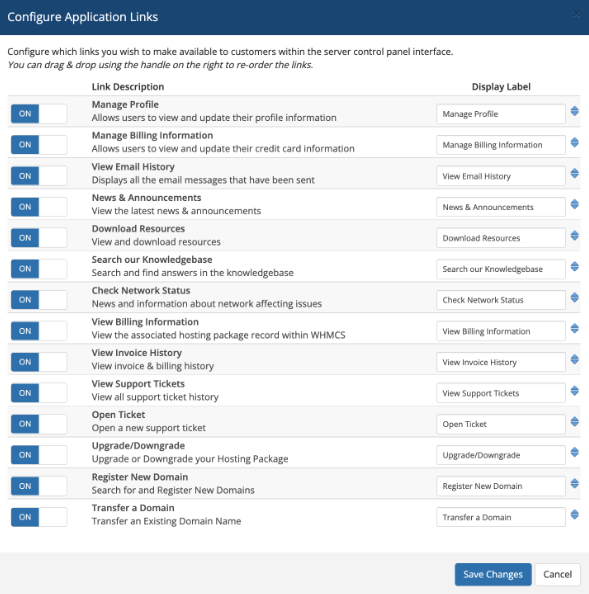
- For each link that you want to configure (see below):
- Toggle links to On to display them or Off to hide them.
- If you want to change a link’s display name, enter the desired name under Display Name.
- Use the arrows on each row to reorder the display order of the links.
- Click Save Changes. If you have enabled or disabled Application Links for an application, the status indicator will update to reflect that the syncing of your configuration changes has begun.
- Wait for the sync to finish.When the process finishes, the status indicator will update to indicate which applications and links are enabled or disabled.If you navigate away from the page while the sync is still in progress, it may not fully sync all links.
Supported Links
You can enable and configure custom display labels for the following links:
| Destination Type | Destination |
|---|---|
| Ordering |
|
| Support |
|
| Account |
|
Application Link Activity Log
The Application Link system has its own activity log. The log displays entries for the last provisioning operation that you performed for a given application (activation, configuration changes, or deactivation).
To access the log for an application, click View Log.
The Application Link logs use the following logging levels:
- Debug — Event-based logging, like the start and completion of processes.
- Information — The system is attempting to provision links to a server that does not support Application Links. Typically, this means that it requires a newer version of the third-party application.
- Notice — No servers for the given application support Application Links. Typically, this means it requires a newer version of the third-party application.
- Warning — Error messages that the application or module itself returned. These typically require attention.
You can safely ignore some of the warnings that appear in this log. For example:
- A
cPanel Account Username not founderror indicates that your WHMCS installation has records for a cPanel account that does not exist on the server. - A
The value of “user” may not be emptyerror indicates that cPanel accounts on your WHMCS installation do not have a specified username, and so the system cannot provision them.
User Permissions
There is a one-to-one relationship between a given cPanel hosting account and a WHMCS client. Because there is not a multi-user system for cPanel accounts, you must use single sign-on to authenticate as the WHMCS account owner. While WHMCS can control which users have permission to use single sign-on to authenticate with cPanel, the reverse is not currently possible. For this reason, restricting single sign-on is possible at the user and account levels.
- The client account owner can revoke the Single Sign-On permission for the user at Hello, Name! > User Management in the Client Area. Admins can remove this permission by clicking Manage User in the client’s profile’s Users tab.
- The client account owner can disable single sign-on for the account at Hello, Name! > Security Settings. Admins can disable Allow Single Sign-On in the client profile’s Profile tab.
Last modified: 2025 July 28