Set Up Amazon S3 Storage
You can use Amazon S3™ as your storage provider in WHMCS.
- Before you can configure Amazon S3 in WHMCS, you must create an Amazon S3 Bucket.
- In addition to Amazon S3, WHMCS supports Amazon S3-compatible services like Ceph. However, WHMCS only supports automatic migration between two S3 locations if both locations use the same storage provider.
Configure an Amazon S3 Storage Provider
To configure Amazon S3 as your storage provider:
- Go to Configuration () > System Settings > Storage Settings.

- Select the Configurations tab.

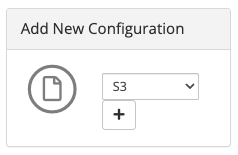
- Under Add New Configuration, select S3 and click +. Additional configuration options will appear.

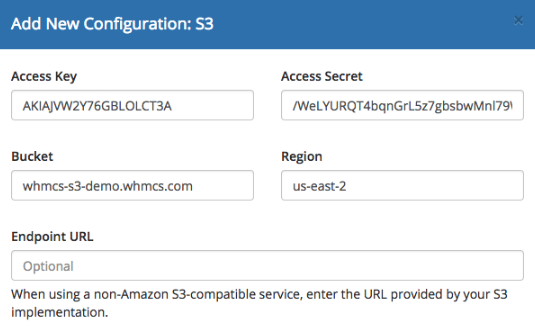
- Enter the Access Key, Access Secret, Bucket, and Region for your Amazon S3 bucket.

- The S3 access credentials must have read and write access to the specified S3 bucket. This must include the following permissions:
- ListBucket
- GetObject
- PutObject
- ReplicateObject
- DeleteObjectFor an example of a suitable policy for the S3 user, see Example Security Policy below.
- You must specify the S3 region by its code name (for example,
us-east-1for US East (N. Virginia)).
- The S3 access credentials must have read and write access to the specified S3 bucket. This must include the following permissions:
- If you are using an S3-compatible provider that is not Amazon S3, enter an endpoint URL for your provider. The system doesn’t require the Endpoint URL value if you’re using the Amazon S3 service.Endpoint URLs must begin with
https://. - Click Save Changes.
If WHMCS is unable to connect, an error message will display. Check your entries and the permissions of your configured API user and try again.
Migrate from Local Storage to Amazon S3
Automatic migrations run in the background. While a migration is running, you cannot change the setting for that file type.
To migrate from local file storage to your configured Amazon S3 storage:
- Go to Configuration () > System Settings > Storage Settings.

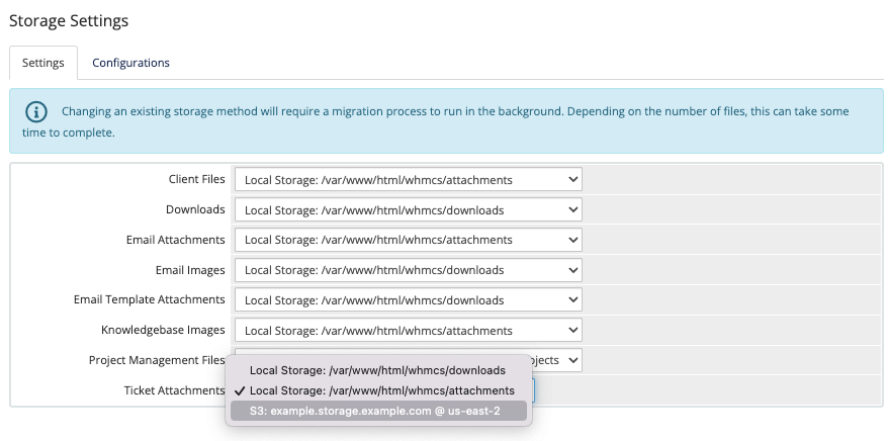
- For each file asset type that you wish to change, select the desired S3 storage location.

- Click an option for changing the storage location:
- Click Migrate to automatically migrate all of the stored files in the current storage location to the newly-selected location.
- For smaller scale deployments, migration will take less than a minute, and your files will then exist in the new location.
- If the migration cannot happen immediately, the system will schedule it to run in the background. Until it finishes, the system will continue using the former location.
- Click Switch to change the storage location without performing any automatic migrations. Use this when you plan to migrate the existing stored files manually or have already migrated them.

- Click Migrate to automatically migrate all of the stored files in the current storage location to the newly-selected location.
- If you clicked Migrate, after the automatic migration finishes, validate whether the migration was successful.
- Delete the files in the prior location. The system will not automatically delete these files.
Example Security Policy
Consider using the IAM Policy Generator tool in the AWS control panel or the public policy generator tool.
For advanced users, an example Amazon S3 policy to assign to the S3 user for use with WHMCS storage settings is below:
  {
       "Version": "2012-10-17",
       "Statement": [
           {
               "Sid": "Stmt1111222223333",
               "Effect": "Allow",
               "Action": [
                   "s3:ListBucket",
                   "s3:GetObject",
                   "s3:GetObjectAcl",
                   "s3:PutObject",
                   "s3:PutObjectAcl",
                   "s3:ReplicateObject",
                   "s3:DeleteObject"
               ],
               "Resource": [
                   "arn:aws:s3:::<BUCKET_NAME>",
                   "arn:aws:s3:::<BUCKET_NAME>/*"
               ]
           }
       ]
   }
Cancel a Migration
To cancel an ongoing migration, click Revert Changes. The system will then continue using the current location but will not delete any files that are already in the new location.
Last modified: 2025 July 28