Email Campaigns
You can send form field email messages to clients using specific criteria with the Email Campaigns feature. This feature includes a queueing process and email delivery provider integration to transparently process many campaigns simultaneously. It also has retry capabilities to protect against network availability issues.
You can choose to send a message to all of your clients or limit it to clients that meet specific criteria.
You can access this feature at Utilities > Email Campaigns.
Create a Campaign
To create a new email campaign:
- Click Create New Campaign.
- Enter an email campaign name.
- Choose the type of email to send, which sets the criteria to use to select the email’s recipients. You can choose from the following options:
- General (Default) — Filter by the client status or country criteria.
- Product/Service — Filter by product-related criteria.
- Addon — Filter by addon-related criteria.
- Domain — Filter by domain-related criteria.If you do not want to filter clients by a specific criteria, do not change that filter.
- Update Client Criteria to filter by the desired criteria. To do this, select one or more items from the lists. For example, select United States for Country to only send the email campaign to clients with US addresses.
- Click Compose Message.
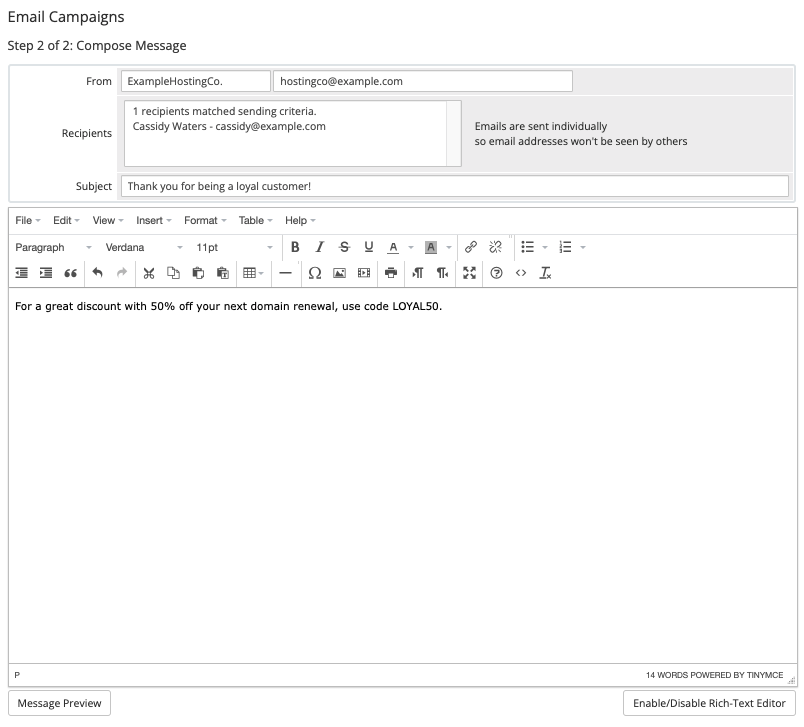
- Check the From information and list of recipients to ensure that they are correct.If the criteria for an email includes no recipients, the system can’t send it. Most commonly, this is because you selected a client group or language to which you have assigned no clients. Go back and select a different set of criteria.
- Enter a subject and body message for the email.
- The bottom of the interface lists values that you can display in the message, like displaying the client’s name or an Unsubscribe link.
- Click Message Preview to preview your message.
- Click Enable/Disable Rich-Text Editor to use the rich-text editor.
- Add any desired attachments.
- Check Marketing Email? to prevent sending this message to anyone who has opted out of marketing emails.
- Check Save Message and enter a name to save the message for future use.
- Use Start Date/Time to schedule when the email will send.
- Click Save Draft to save the message, or click Send Campaign to send the message immediately or, if you set one, at the scheduled time.
When you compose the email, you will see the first 50 clients matching your selected criteria in the To field, so that you can review the recipients. However, the system will send each email individually. The receiver will not see any other client addresses in the To field of the copy they receive.
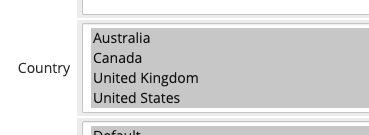
Filtering by Country
You can send mass mailings to only clients in specific countries. To do this, select the countries as in the example below:
Contacts
You can use contacts to send a copy of a message to a different email address. When sending one-time or mass mails, clients and users who have enabled the General email notification option will receive a copy of any General emails that you send to the client.
If the contact has enabled Product email notifications, they will receive copies of emails with the Product/Service email type. If they have enabled Domain email notifications, they will receive copies of emails with the Domain email type.
The recipients list doesn’t include contacts when composing the message. However, if the master account appears in the list and the contact has the appropriate email permissions, they will receive a copy.
Mailing Lists
You can create a mailing list using custom client fields. To do this, go to Configuration () > System Settings > Custom Fields. You can use the Dropdown or TickBox types. If you choose Dropdown, make sure to enter the necessary options.
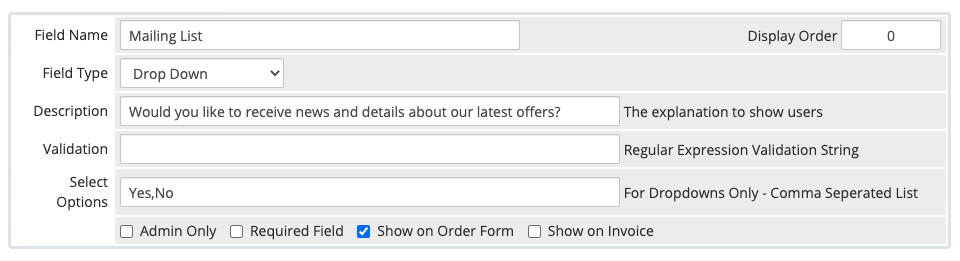
This will display as a client filter option. You can only send this to clients who have chosen to receive these mailings.

Working with Email Campaigns
After you create a campaign, it will appear in the list, with information about its status, sending progress, and other details. You can also perform several actions:

Internal Queue vs. External Send Requests
You may see campaigns that display 100% completion for Sending Progress but that have Sending as their status. This is due to differences between the internal email campaign process queue and external send requests.
When WHMCS starts sending a campaign, it will batch messages to the recipients (determined by your criteria) in increments of 50. A batch of these messages goes into a process queue every five minutes, at maximum, or with the frequency at which your cron runs if it runs less frequently. For example, if your cron runs every three minutes, the batches would go to the process queue every five minutes. If your cron runs every ten minutes, the batches would go to the process queue every ten minutes.
- Sending Progress reports the status of this process. WHMCS sends the items in the process queue as API requests or emails to your mail provider. This occurs at a rate of
25recipients per minute, depending on the frequency of your cron command. This is the total sending rate of all email campaigns. A new campaign will not begin sending until the previous campaign is complete. - The Sending Report contains the status of the external send requests, including a list of failures (see below).
Sending Report
Click View Sending Report under Sending Progress to view a report on the external send request status for the campaign.
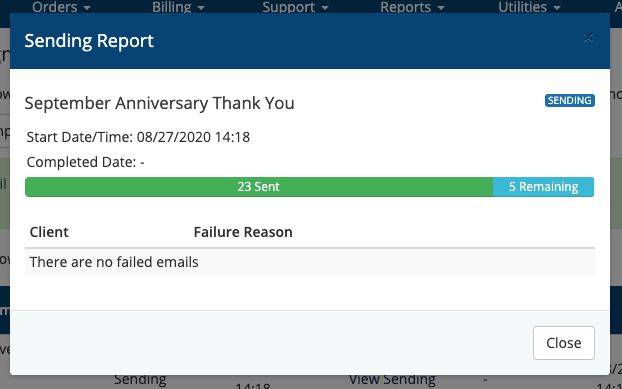
This report includes the time at which the campaign started sending and the completion date (if there is one). Below this, you can view a sending progress bar and a list of failed recipients.
The progress bar increments as the mail provider accepts messages. If the mail provider does not accept a message or there are failures to contact the mail server, WHMCS will automatically retry sending the message three times. After three retries, the system adds that message to the list of failures.
Invalid Recipient Addresses
For any recipients with invalid email addresses, the system will abort sending the message. The system will not retry sending to these addresses.
External Problems
If the system experiences external problems during sending, such as invalid SMTP details or problems with the SMTP server, it will retry sending indefinitely, with a new attempt every five minutes.
If this occurs, pause the campaign, fix the external issue, and then click Resume.
Managing Campaigns
To manage your campaigns, click Manage Campaign under Actions. Then, choose one of the options below:
Editing and Pausing Campaigns
If you created a campaign and saved it as a draft, or if you scheduled it for the future but it hasn’t started sending yet, you can edit it. To do this, click Edit in the list of campaigns.
Click Pause to pause further queuing of messages for sending under this campaign. You can then click Resume here to resume queueing. Queued emails will continue to send after you pause the campaign.
Message Preview
Click Message Preview to view a preview of the campaign message. To update this message for queued campaigns, click Edit.
Delete
Click Delete to delete the campaign. This will prevent future campaign emails from sending and will remove the campaign from the list.
Last modified: 2026 April 30